Baxter and Sawyer Introduction and Resources
Table of Contents
1 Introduction to Baxter and Sawyer
Baxter is a manufacturing robot made by Rethink Robotics. Baxter is designed to work around people; he doesn't move very fast, and he doesn't have much strength – maximum payload is only 5 lb (2.2 kg) and the max grip strength is only 10 lb (4.4 kg). The manufacturing version of this robot features a suite of software called Intera that allows users with very little robotics experience to quickly train tasks without any programming.
They also make a research version of the robot that does not feature the
Intera software. Instead, a powerful interface to the robot is provided by
ROS. Much of the low-level software is still proprietary, but interfaces to
the proprietary software are provided via ROS topics, services, and actions.
They also provide a Python library that simplifies the ROS interfaces
required. For example, let's say we want to move the arm to a desired set of
joint angles. We could create a publisher, fill out a full joint state
message, and publish that message on an appropriate topic, and Baxter would
move to this desired pose. Alternatively, we could use their Python library to
simply call the baxter_interface.limb.set_joint_positions() function (source code here).
Sawyer is a newer robot that is very similar to Baxter. Sawyer has only one arm, but it is much higher performance than Baxter's (more precise, faster, more powerful, greater range of motion per joint). Sawyer has also moved away from separate research and manufacturing versions – all Sawyers have both a ROS-based interface (called Intera SDK), and the easier-to-use Intera manufacturing interface. Currently you only have to reboot the robot to switch between the interfaces.
1.1 List of Physical Capabilities
- Baxter: 2 x 7 DOF Arms (14 DOF total)
- Sawyer: 1 x 7 DOF Arms (7 DOF total)
- Series elastic actuator at each joint
- Accurate measurement of the displacement of the elastic element allows computation of the actual torque at each joint
- Automatic arm calibration
- Re-calibrates torque sensors
- Re-learns hysteresis models
- Re-learns crosstalk models
- Onboard Gentoo real-time Linux machine
- Real-time OS communicates with microcontrollers at each joint
- We don't really know what protocol they use
- Motor control loops run at ~1kHz
- Onboard safety controllers
- Avoid self-collisions
- Limit accelerations
- Torque limits
- Soft joint limit stops
- Distance sensors
- Embedded in the hands
- Sonar ring around head (only on Baxter)
- Cameras
- One in each hand (2 on Baxter, 1 on Sawyer)
- One in the head
- User input/output
- Head display
- Head motion control (pan/tilt)
- Buttons on grippers
- Buttons and navigators on arms
- Grippers and sensors
- Accelerometers in hands
- We several sets of electric parallel grippers
- Baxter has air hookups for vacuum grippers
- Not too difficult to make custom grippers
2 Notes on Series Elastic Actuators
The design of robot mechanisms featuring accurate force control was (is) an extremely active topic of research for many years. Traditionally, these robots were designed by building an extremely stiff mechanism, and then tuning a highly accurate model of the machine. Combining this accurate model with a way to sense torque at each joint yielded a robotic mechanism that could accurately apply forces at its end effector. Typically torque would be sensed by sensing the current flowing through the motors and using a model of the motor to extract torque. Many robots are still designed and manufactured this way.
One inherent challenge with this type of robot is that it is extremely difficult to deal with a variety of different dynamic properties that may be attached to the end effector. For example, imagine you want the end effector of a robot arm to apply a constant force into a surface. The physical properties of that surface are going to drastically effect how the arm will move during this force application. Designing joint-level controllers that respond well to all types of external load dynamics the robot can encounter is a very serious problem.
In the mid 1990s, several new ideas began to emerge related to intentionally designing compliance into robotic mechanisms. By building a mechanism that is inherently elastic, you can avoid some of the challenges of the stiff design. For example, surface chatter, power density, and noise. The idea of a series elastic actuator first arose in 1995 in work at MIT in Gil Pratt's lab. The idea is relatively simple, let's intentionally place a well-understood elastic element in series with the drive mechanism. We will design our controllers to compensate for this extra elasticity to still provide correct external forces. We will compromise some bandwidth, but we will gain robustness.
A very stiff mechanism allows high bandwidth force control, and it is easy to achieve high positional precision. However, a very small joint displacement can result in very high forces if the mechanism is pushing on something stiff. Thus, small errors in measuring joint positions results in large errors in applied force. If we place an elastic element in series with the load, it will reduce this sensitivity. Further, by measuring the displacement of this elastic element, we can get highly accurate force measurements. Because the displacement of the elastic element completely specifies what the output force will be, we also have converted our force control problem into a position control problem (which is much easier). The biggest downside is that we have compromised our bandwidth, and complicated our lives for accurate position control.
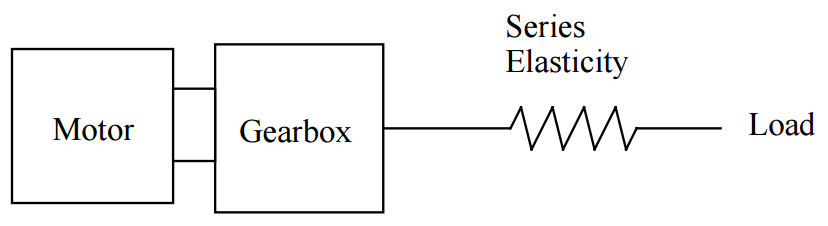
Figure 1: Schematic of a series elastic actuator. Borrowed from Matt Williamson's thesis linked at the bottom of this page.
As a simple illustration of how this process works, consider the following figure.
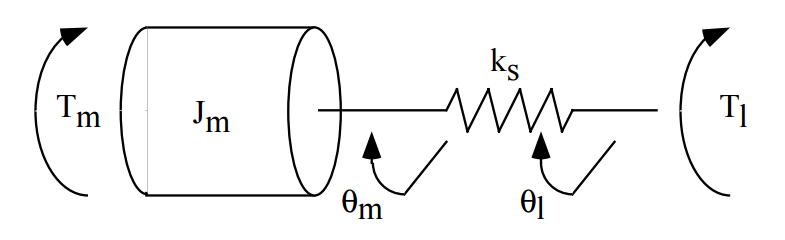
Applying Newton's laws, we can write the following equations
\begin{align*} T_m + k_s\left ( \theta_l - \theta_m \right ) &= J_m \ddot{\theta}_m \\ -k_s\left ( \theta_l - \theta_m \right ) &= T_l \end{align*}With these equations, we can figure out what motor torque \(T_m\) is required to achieve a desired output torque \(T_l\). If the load is clamped such that it cannot move, designing a controller that will stabilize to the correct spring displacement is quite easy. If the load is allowed to move, then we must compensate for this motion to always provide the correct amount of spring "windup" as the load moves.
3 Notes on Working with Baxter and Sawyer
- SSH
- On older versions of the robots, there was no access to the on-board
computer; this is no longer true. You can now
sshinto Baxter and add your ROS code directly to the robot's on-board computer. In this way, you could get demonstrations or projects to run without requiring an external workstation computer. You cannot install packages (nosudopowers), but you can perform some basic administration tasks such as restarting the computer. Check out the Baxter SSH instructions and/or my SSH lab that we did during the hackathon. You likely do not need tosshinto Baxter to run your demos, but it may help with debugging your networking setup. - Network Setup
- Networking is by far one of the trickiest issues for new users working with Baxter. Not only do you need to have the network setup correctly, but you need your ROS environment variables to be setup correctly. Rethink provides the baxter.sh script and the intera.sh script to help people ensure that their environment is setup correctly. I personally do not like using this script because all it really does is set a couple of environment variables, and I prefer to manage them myself. However, the script also messes with your command prompt spawns a separate Bash instance which causes weird issues with your command history. The Workstation Setup page and the Hello Baxter page contain a set of instructions on how to setup and test that you have your network functioning properly for Baxter. For Sawyer, check out the Intera SDK setup page and the Hello Robot instructions. Below, I have instructions for setting up networking with our Baxters and Sawyers.
- Gazebo
- Rethink has a nice simulation environment setup for Baxter and Sawyer. Check out the install instructions for Baxter (you'll have to build from source on Melodic, but hopefully that doesn't cause too many problems). The Gazebo simulator is very nice for testing high-level state-machine-type functionality, perception code, motion planning, kinematics, and more. You may have trouble simulating grasping. For Sawyer, check out the Gazebo Tutorial.
- V-REP
- There is decent V-REP support for Baxter and Sawyer, with a variety of grippers. Check out Jon Rovira's V-REP Baxter Demo that he made in 2014 to get started.
- MoveIt!
- Both Baxter and Sawyer have been configured to work with MoveIt!. For Baxter, check out the moveit_robots package, and for Sawyer the sawyer_moveit package. Check out the tutorial on the Baxter SDK wiki and the MoveIt! tutorial on the Intera SDK wiki for Sawyer. This setup will generally work well for large-scale motions and executions. However, I have not had much luck with getting MoveIt! to automatically plan grasps or pick and place maneuvers. You must also be careful about the fact that the URDFs do not necessarily reflect the true geometry of the grippers (they might not even be there see the URDF section below for more information). We'll discuss MoveIt! in more detail in class soon.
- Baxter Roscore Crashes
- Several times in the past (very rarely), I've
encountered a few instances where it seems that
roscoreon Baxter crashes. The symptom is that Baxter doesn't respond to any topics/services that you publish/request, and commands likerostopic hzfail for all advertised topics (produced by Baxter). I can still SSH into Baxter so I'm pretty sure this is not a networking issue. Right now the only solution I've found is to restart Baxter. I don't think we will run into this, but I figured it was worth mentioning. I've seen no such issues on Sawyer, but I have had a number of other instances where Sawyer had trouble initializing immediately after booting or after some sort of fault condition. A restart has always fixed these issues. - Robots Failing to Initialize
- Several times in the past courses, we've had
issues where Baxter would boot up, but we would be unable to enable
Baxter even though all networking tests passed successfully. Digging
through log files with the support of Rethink, we were able to identify a
hardware issue with the left shoulder joints. This was likely just loose
cables after disassembling the arm and checking all of the connections
(with Rethink's advisement), we re-assembled Baxter and have since rarely
experienced this issue. One symptom that was noted was that when this
issue is occurring, Baxter takes far longer to boot up than usual.
Typically, restarting Baxter several times is enough to get around this
problem. *To avoid this problem, I'd recommend leaving Baxter and Sawyer
booted all of the time (unless you have good reason to reset). However,
please be sure to disable the robots before leaving unattended:* Baxter:
rosrun baxter_tools enable_robot.py -dSawyer:rosrun intera_interface enable_robot.py -dI've seen similar problems with Sawyer occasionally not being able to enable after booting, but it is far less common and a restart has always fixed the issue. - Arm Kinematics Calculations
When working with robot arms, one will likely want to be able to compute things such as forward kinematics, inverse kinematics, and manipulator Jacobians. With both robots, these things are relatively easy to compute. The forward kinematics at the current pose of each arm is always available via the
/robot/limb/<side>/endpoint_statetopic (the Python APIs for both robot's SDKs have nice interfaces to these topics as well). This topic will tell you the pose, velocity, and wrench of the end effector. If you would like to do forward kinematics for an arbitrary \(q\) (rather than the robot's current configuration, there are several things you could do. You could start a specialrobot_state_publisherthat listens on a special topic just for forward kinematics calculations, and then you could usetfto compute forward kinematics. This entire process could even be wrapped with a simple Python API. Alternatively, you could use a package such as KDL/PyKDL, or you could even use themodern_roboticslibrary from ME 449.For inverse kinematics, Baxter and Sawyer provide an IK service. This service works well, but it takes a bit of user effort to ensure you are getting the answers that you want. It is a numerical solver, and sometimes, even if the desired end effector pose is reachable, the algorithm may fail to converge. One way to get around this is by using the
seed_modeandseed_anglesin the request. If the service fails to converge even though the target pose is in the reachable workspace, often, just re-requesting with a different seed is enough to find an answer. Note that the IK service request also accepts an array of poses. The service will iterate over all poses and as soon as a valid solution for one of the poses is found, it will return that set of joint angles. This could be another strategy for finding useful IK solutions.If using MoveIt! with either robot, you ideally don't have to worry about any forward or inverse kinematics calculations yourself. Instead the MoveIt! kinematics plugins take care of all of these computations. The configuration for Baxter in the moveit_robots package includes both KDL and IKFast-based plugins. Sawyer's sawyer_moveit currently only uses KDL (like all MoveIt! configurations). Once MoveIt! is properly loaded and configured, if you do need low-level kinematics computations, you can either directly use services provided by MoveIt!, or you can use MoveIt! APIs (mostly C++).
If you were interested in using the Modern Robotics library from ME 449, all you would need to do is calculate the screw axes at the zero configuration. I've done this manually for Baxter and Sawyer, and have a mostly-working automatic converter from URDF-to-screw axes. If you'd like my conversions (use at your own risk, but my tests seem to work), they are available at this gist.
- KDL and PyKDL
- KDL is the Kinematics and Dynamics Library, and it is
part of the Orocos project. Much work has been done to
provide tools for converting from URDF representations into
KDL chains and trees (via the kdl_parser package). Some
fairly recent work has wrapped many of the low-level KDL
functions with Python code (distributed via the
python_orocos_kdl package). One of the most useful
applications of this is the pykdl_utils package from Kelsey
Hawkins at Georgia Tech. This package further wraps KDL to
provide a very easy-to-use python interface to KDL
computations such as Jacobians and forward/inverse
kinematics. Note that when working with Baxter, there is
also the Baxter PyKDL package. This package is very similar
to pykdl_utils, but it is a bit more optimized for working
with Baxter specifically. I've had great luck with using
pykdl_utilsfor solving FK/IK for a variety of robots. - Sawyer's Motion Interface Capability
- Sawyer has a new "Motion Interface" that supports several advanced trajectory generation and control techniques directly on the robot. The documentation is not all that great, but I've generally been able to figure out how to get what I want by studying the examples. There are some very nice tools for smoothly moving the end-effector in Cartesian space that you may find useful on your final projects.
3.1 URDF Notes and Issues
Each Baxter/Sawyer has its own internal URDF that is meant to accurately
reflect the geometry of each individual robot. Certain steps in the
manufacturing process are not precise, so calibration is performed at the
factory to build a robot-specific URDF. Once the robot is booted, this URDF
is automatically added to the parameter server as /robot_description. A
generic URDF for Baxter is available in the baxter_common Git repo inside of
the baxter_description package, and Sawyer's generic version is in the
sawyer_robot package. The generic URDFs are fine for imprecise tasks, but the
robot-specific URDFs should be used for high-precision tasks.
Both robots run two instances of the robot_state_publisher to accurately
reflect the transformations for both the real, sensed pose of the Robot, and
any commanded poses. More details about Baxter's URDF and robot state
publishers are available here (also applicable to Sawyer). One important
"gotcha" related to robot's URDF has to do with the fact that the robots can
have multiple types of grippers attached, and they are capable of
automatically detecting and updating the internal model of which grippers are
attached. Unfortunately, the robot_state_publisher was never designed to
automatically handle dynamically-changing URDFs. So even though the robot can
get internal knowledge of the grippers to change, it was difficult to get the
ROS representation of the grippers to change. This is what inspired the
development of the mutable robot state publisher (MRSP) (which runs on both
robots).
The MRSP subscribes to a new topic called /robot/urdf of type
baxter_core_msgs/URDFConfiguration (or intera_core_msgs/URDFConfiguration for
Sawyer). This topic allows you to specify snippets of URDF to append or
remove from the URDF that is currently on the /robot_description
parameter. When the MRSP receives this message, it updates the
/robot_description parameter and its own internal representation of the
robot's kinematics. This way, you can add/remove grippers, or reconfigure
which fingers are bolted onto the grippers. Rethink has a nice example that
accepts command line arguments to specify details of this topic. The code walkthrough of that example is helpful in understanding how you would use this topic in your own nodes (the example also exists for Sawyer).
When Rethink released the MRSP, they also updated the baxter_common meta-package to include a description of all of the Rethink-made grippers (the intera_common package contains the intera_tools_description package). We are specifically interested in the parallel electric gripper configurations. Using an Xacro file that properly describes a parallel gripper and its particular finger configuration (here's an example) along with the /robot/urdf topic subscribed to by the MRSP, it is possible to ensure that your ROS world's representation of Baxter's grippers exactly matches the configuration in the real world (which may be highly desirable, depending on your exact application). As a concrete application of this, check out this commit from the repository containing the demos for the Willens Wing Baxter. This commit adds a line to the main launch file that starts a Bash script. This Bash script simply uses the Rethink's send_urdf_fragment.py example to set the ROS representation of Baxter to match the real-world configurations of his grippers. Since the Willens Wing Baxter's grippers don't match the default, we have a fork of the baxter_common package where we've updated the description of the gripper's fingers to match the real Baxter.
Getting the real-world Baxter/Sawyer to match the ROS representations is
especially important if using MoveIt!. If you'd like MoveIt! to plan
collision-free paths that properly consider the geometry of the grippers then
MoveIt! needs to know about the gripper geometry. Since the creation of the
MRSP, Rethink also updated the moveit_robots package to allow the SRDF to
be automatically reconfigured using Xacro files. So for example, check out
the baxter.srdf.xacro file that now includes arguments that allow you to
specify whether or not you'd like to insert the grippers into the SRDF (also
exists for Sawyer). Also note that they now have multiple launch files to
specify whether or not you want the grippers to be considered by MoveIt!
(baxter_grippers.launch adds grippers, and demo_baxter.launch does not).
4 Recommended Networking Setup Instructions
There are a variety of ways that you can configure networking with Baxter/Sawyer. These are described in detail on the ROS Network Setup Guide and the Baxter SDK Wiki Networking page. In general, I don't recommend trying to connect Baxter to a router that has numerous other connections. My advice is to either connect directly to Baxter/Sawyer via an Ethernet cable or connect via a router that is being used solely for computers involved in the Baxter application (there are multiple pre-configured routers in D110).
The directions below should give you a general idea of how to setup networking with our robots. The same instructions should work for Sawyer and Baxter. However, networking in general can be fairly complicated, and I wouldn't be surprised if many of you run into issues/complications. I can try and help debug, but you may end up using the internet as a primary debugging resource.
The first year of the course, my recommendation was to directly connect your computer and Baxter via an Ethernet cable as described here. This is very reliable, and ensures that the only ROS communications with Baxter are coming from your computer. However, we had issues when attempting to switch to a different computer. We would often run into name/IP conflicts, and the only solution was to restart Baxter. This could certainly be worked around, but the bigger disadvantage of this setup is that it is tricky to also use your wireless internet at the same time.
The second year, I adjusted our Baxter's networking setup, and came up with the two solutions below. With either solution, you ought to be able to easily connect to Baxter without editing any configuration files, and you should still be able to use the internet on your machine. The primary difference between the two techniques is whether you will have only one machine or multiple machines communicating with the robot. One machine is easier to control and debug issues, but sometimes it is nice when working in a group to allow everyone to connect to the ROS network at the same time.
For reference, the networking configuration from a Field Service Menu for Baxter/Sawyer is shown below. You shouldn't need this information unless you are attempting a networking setup not discussed below (or if one of the techniques does not work). Please don't edit the FSM settings!
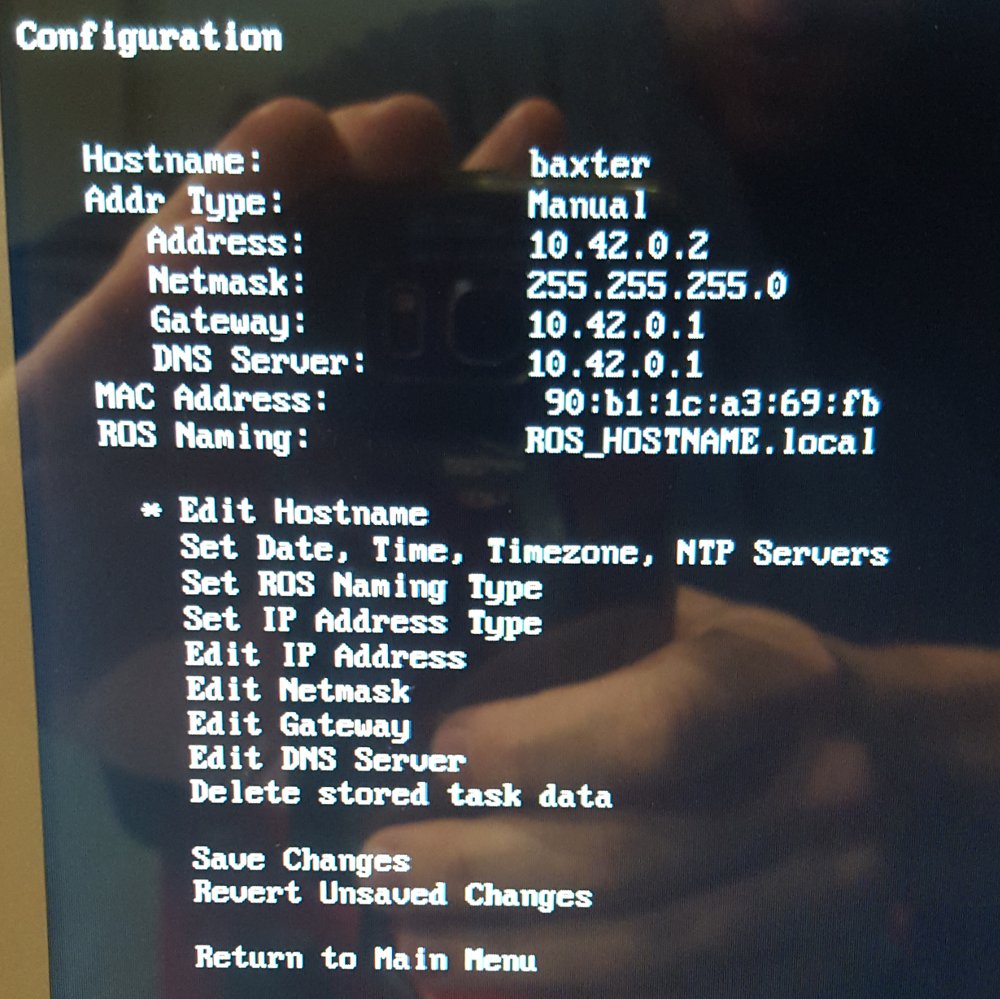
Figure 3: Baxter's FSM network settings.
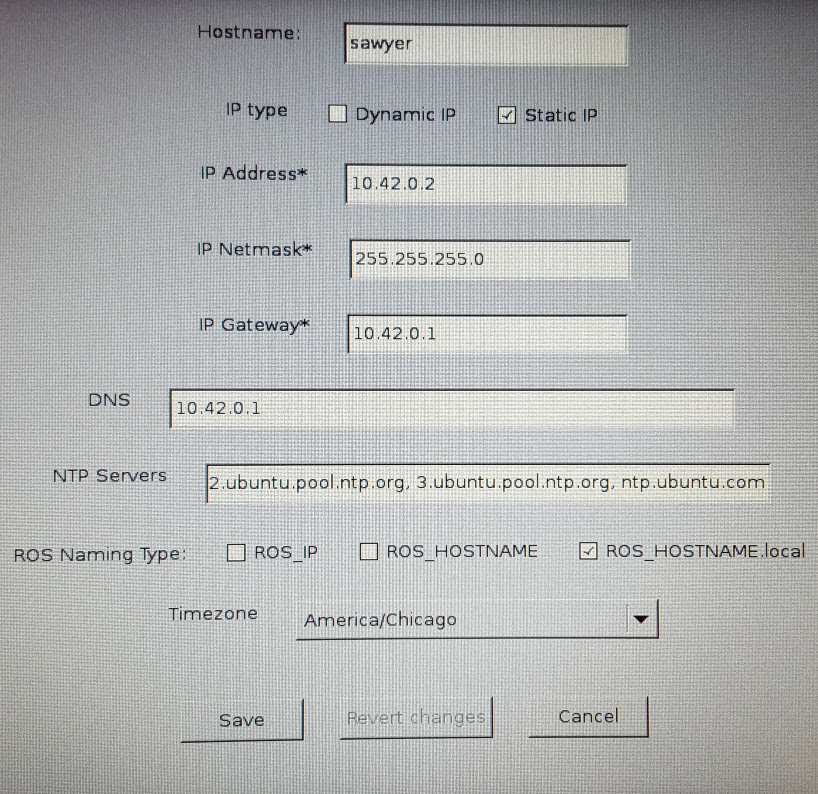
Figure 4: Sawyer's FSM network settings.
4.1 Direct Ethernet Connection via Network Manager
The default program for managing networking on Ubuntu is called Network Manager. In this connection scheme, we will directly connect an Ethernet
cable between Baxter/Sawyer and your computer. This option has two main
benefits. First, only your machine and the robot will be on the network. This
will make certain types of issues much easier to debug. It will also help to
eliminate unnecessary traffic, and is quite fast. The second benefit is that
you will still be able to use your wireless card in your computer to connect
to any wireless networks. Thus, you should still be able to use the
internet. The primary downside of this technique is that only your computer
will be able to communicate with the ROS master that the robot is running.
Moreover, there is a slightly higher chance that you will encounter issues
with name resolution in this setup (meaning one of the machines may have issues associating hostnames – e.g. baxter.local – with its corresponding IP address). Although, that is not as big of a deal because both your computer and the robot will have static, predictable IP addresses which means there is little downside to using IP addresses in ROS_MASTER_URI and ROS_IP.
4.1.1 Setup Steps
- We first need to create a new wired connection that we will always use
when connecting to the robot. To do this, let's open
nm-connection-editorfrom a terminal or by usingAlt-F2. - In the
Network Connectionswindow that pops up, click the+button in the bottom left to add a new connection. - In the
Choose a Connection Typepopup, choose Ethernet from the dropdown, and then clickCreate.... - In the
Editing Ethernet connection XXXwindow that pops up, enterRethinkin theConnection name:field. - Navigate to the
Ethernettab below, and locate theDevice MAC addressdropdown. You will likely only have one option here, and it will be a MAC address followed by something likeeth0orenp3s0f1in parentheses. Choose the only option if you only have one. If you have more than one, that most likely indicates that your computer has more than one Ethernet device. You'll need to figure out which device you are going to use to connect to Baxter (let me know if this happens to you). - Navigate to the
Generaltab. UncheckAutomatically connect to this network when it is available. This will prevent you from accidentally trying to connect to the Robot when you plug your Ethernet port into other devices. - Change to the
IPv4 Settingstab. Under theMethod:dropdown, chooseShared to other computers. - Click
Save. - Connect an Ethernet cable between your computer and the robot.
- In the
network-managericon in the top panel, choose theRethinknetwork that you just created. You can also control which connections you are using with the command-line toolnmcli("network-manager command line interface"). For example, something likenmcli connection up Rethinkwould connect to the newly-created connection. You can see all of your current connections withnmcli device status. - In a terminal, you should now be able to type
ping baxter.localorping sawyer.localand see responses from the robot. Assuming your ROS network environment variables are set correctly, you should now be able to work with the robot. If you cannot ping the hostname, try pinging the IP address withping 10.42.0.2. If that works, but you cannot ping via hostname, then you are having a name resolution problem. See below for steps you can use to try and fix this.
4.2 Router Connection
In this setup, we will plug the robot into a specially-configured
router. This router has been setup to be compatible with the FSM settings
shown in Figure 3. The whole idea here is that we have manually set the
robots to be compatible with Network Manager's default settings when the IPv4
settings are set to Shared to other computers (that is why the previous
technique works). In this setup, we have configured a router to be compatible
with the robot's networking setup so that Baxter/Sawyer can connect to the
router with its manual configuration. In order to get our computer to connect
to this network, we need to create a new custom Ethernet connection with
slightly different settings. When using this configuration, you should be
able to connect to the internet, and multiple group members should be able to
connect to the robot.
4.2.1 Setup Steps
- We first need to create a new wired connection that we will always use
when connecting to the robot. To do this, let's open
nm-connection-editorfrom a terminal or by usingAlt-F2. - In the
Network Connectionswindow that pops up, click the+button in the bottom left to add a new connection. - In the
Choose a Connection Typepopup, choose Ethernet from the dropdown, and then clickCreate.... - In the
Editing Ethernet connection XXXwindow that pops up, enterRethink Routerin theConnection name:field. - Navigate to the
Ethernettab below, and locate theDevice MAC addressdropdown. You will likely only have one option here, and it will be a MAC address followed by something likeeth0orenp3s0f1in parentheses. Choose the only option if you only have one. If you have more than one, that most likely indicates that your computer has more than one Ethernet device. You'll need to figure out which device you are going to use to connect to the robots (let me know if this happens to you). - Navigate to the
Generaltab. UncheckAutomatically connect to this network when it is available. This will prevent you from accidentally trying to connect to the robot when you plug your Ethernet port into other devices. - Change to the
IPv4 Settingstab. Under theMethod:dropdown, chooseAutomatic (DHCP). - Click the
Routes...button at the bottom of this window. - In the
Editing IPv4 routes for Rethink Routerwindow that pops up, be sure to checkUse this connection only for resources on its network. This is what allows you to still use your wireless card for the internet. ClickOKin this window. - Click
Save. - Connect an Ethernet cable between your computer and the specially-configured router, and connect an Ethernet cable between the router and the robot. Both cables should be in the LAN ports of the router, not the WAN ports. The LAN ports are likely a different color and there should only be one WAN port. The last router I looked at the LAN ports were yellow and the WAN port was blue.
- In the
network-managericon in the top panel, choose theRethink Routernetwork that you just created, or usenmcli connection up Rethink\ Router. - In a terminal, you should now be able to type
ping baxter.localorping sawyer.localand see responses from the Robot. Assuming your ROS network environment variables are set correctly, you should now be able to work with the robot. As with the above setup, if you cannot ping via hostname, you could try using an IP address or simply follow the steps in the next section.
4.3 Network Debugging
Hopefully the above techniques will work reliably, and we will avoid most networking issues. However, there are a few simple things that you can try for debugging the above instructions.
- ifconfig
- Running
ifconfigat the terminal should print out details about your current networking setup. The first thing to check is that you have an IP address listed under theenp3sXXfXX(oreth0on older machines). device. Under that section look for something in the second line that looks likeinet addr:10.42.0.XXX. If you are directly connected to the robot, the last number should be a1, if you are connected through the router the last number should not be a1. The last number should never be a2. - ping/ssh
- Once you think you have established a connection, you can test
your networking using
pingandssh. First try pinging the robot's computer usingping 10.42.0.2. If you get responses like64 bytes from 10.42.0.2....then you are connected. Now try pinging using the robot's hostname (ping baxter.localorping sawyer.local). If this also returns a response, then your hostname resolution is working (see avahi-daemon below). This is a really good sign! To further test your networking you can try logging into the robot's computer usingsshby typing something likessh ruser@baxter.localorssh ruser@10.42.0.2. If it asks you for a password (which isrethink), this is also working! Note you cannotsshinto Sawyer. - avahi-daemon
- If we want to be able to refer to the robot's computer and
your computer using hostnames (instead of IP addresses), we
must be able to complete "Hostname Resolution". If you are
directly connected to the robot, your computer is
responsible for this. If connected through the router, the
router should help with this. In either case, you will
likely need the
avahi-daemonprocess running. If you are having issues with hostname resolution, you may be able to ping the robot using an IP address, but not usingbaxter.local(orsawyer.local). If this happens, try restarting/starting avahi usingsudo service avahi-daemon restart. This is likely the first debugging step if you are sure your environment variables are correct, and you are still unable to enable/disable the robot. - avahi-browse
- If you are sure your IP address communication is working,
and you are sure
avahi-daemonis running, but you are still unable to ping/ssh with baxter using his hostname, you could try usingavahi-browse -a -r. This command scans the network and returns the hostnames and IP address pairs that it finds. Check to make sure that you can findbaxter.localorsawyer.localand that the assigned IP address is10.42.0.2. I've seen a few instances where the wrong hostname gets assigned due to conflicting configurations, and the only solution I've seen so far is to restart Baxter. There is almost certainly a better way to fix this issue if it does happen regularly, but it hasn't happened enough for me to bother to really get to the bottom of it. Restarting the robot takes a long time, but it does fix the issue. - Environment variables
- You need to have your
ROS_MASTER_URIto be set to talk to the ROS master on the robot. So yourROS_MASTER_URIshould only be set to eitherhttp://baxter.local:11311orhttp://sawyer.local:11311. You will also need to set eitherROS_IPorROS_HOSTNAME(not both) to tell the robot how to connect to your machine. In general, if hostname resolution is working, that is the preferred connection method because it is more robust to changing IP addresses (especially if connected through the router). If hostname resolution is not working, don't hesitate to switch to IP addresses as described below. Note: to setROS_HOSTNAMEcorrectly you could use a command likeexport ROS_HOSTNAME=$(hostname).local - IP address instead of hostnames
If you are having trouble with name resolution. You could always run ROS using IP addresses alone instead. You should make sure that you have the following environment variables (the
XXXin theROS_IPshould be your machine's IP fromifconfig):$ export ROS_MASTER_URI=http://10.42.0.2:11311 $ export ROS_IP=10.42.0.XXX $ unset ROS_HOSTNAME
Note that this is not robust if you are using a router – the router could always assign you a different IP address. If you are using the direct connection this is probably just fine.
- Edit your
/etc/hostsfile - This debugging step is brute-force, but
highly effective at solving any hostname resolution issues. Simply edit
the
/etc/hostsfile (requiressudo) to add a line like10.42.0.2 baxter baxter.localor10.42.0.2 sawyer sawyer.local. Note, you likely won't want to leave this file like this indefinitely. Feel free to comment out the added line with a#at the beginning of the line when not connecting to the robot. - Restart
- If you were in a scenario where you had to have highly reliable networking every single time, you could absolutely configure your computer and the robot to provide this. However, in this course, we want to avoid any network configurations that may reduce your ability to use the internet on a day-to-day basis. If you have tried all of the above steps and networking still isn't working, as a last resort, try restarting the robot. If that doesn't work, also restart your machine. If you still can't get things to work, talk to me.
If people are having serious networking issues, please let me know. There are numerous other networking strategies that we can try.
5 Useful resources
- Baxter Google Group
- Baxter Wiki Homepage
- Baxter Python API Reference
- Baxter ROS API reference
- Sawyer Wiki Homepage Even if working with Sawyer, don't be afraid to read the Baxter documentation. Much of the information is highly overlapping.
- Sawyer ROS API reference
- Intera Python API reference
- Intera support forum (may not be very active given latest Rethink news)
- Baxter Arm Control Modes This page lists the modes that the arms can be controlled with.
- Sawyer Arm Control Modes
- Matt Williamson's thesis on Series Elastic Actuators
- Northwestern's code for demos in Willen's Wing
- Workstation setup for working with Baxter
- Workstation setup for working with Sawyer
- Baxter Hardware Components Includes joint naming, axes, dimensions, and more
- Sawyer Hardware Components Includes joint naming, axes, dimensions, and more.
- Baxter simulator setup
- Layout of Baxter's Repository (what files are where)
- List of Baxter Publications This could be great place to get some more mathematically complex project ideas (maybe even for future projects)
- Baxter PyKDL package This package contains a few nice tools for performing robot arm calculations for Baxter.
- Baxter tech specs
- Sawyer tech specs
- Baxter Tools This page provides a list of external tools that are useful for working with Baxter. Most of these tools are basic ROS tools.
- Baxter Advanced Concepts Page This page provides detailed descriptions of all of Baxter's core components. Studying the links on this page is vital to understanding how to use Baxter.
5.1 Instructions for Building Baxter Software on ROS Melodic
Most of the Baxter software builds as-is on ROS Melodic, but there are a few issues getting the simulator to compile successfully. Namely, there have been some changes to the C++ API used in packages the simulator depends on. I've pushed a few commits to forks of key packages and written a custom rosinstall file that should work to build the SDK and the simulator. Everything seems to be working with no issues. Commands as usual:
cd
mkdir -p baxterws/src
cd baxterws/src/
wstool init
wstool merge https://gist.githubusercontent.com/jarvisschultz/f65d36e3f99d94a6c3d9900fa01ee72e/raw/baxter_packages.rosinstall
wstool update
cd ..
source /opt/ros/melodic/setup.bash
catkin_make
5.2 Instructions for Building Sawyer Software on ROS Melodic
The Sawyer SDK and the Sawyer Gazebo simulation both seem to work well on ROS
Melodic. That said the installation instructions on the Intera SDK page don't
quite work perfectly. They ask you to use apt-get to install packages that
aren't currently released on ROS Melodic (as of November 19, 2018). One example
is rospy_message_converter and another is sns_ik_lib.
To help with this installation, I've created a custom rosinstall file that
checks out all required repositories for both the SDK and the simulator. Note,
this file specifically checks out the release-5.2.0 branches of all of
Rethink's repositories. This is because our Sawyers have not been updated to
Intera 5.3 yet (and I don't want to update in the middle of a quarter). You
should be able to use this rosinstall file as usual:
cd
mkdir -p sawyerws/src
cd sawyerws/src/
wstool init
wstool merge https://gist.githubusercontent.com/jarvisschultz/f65d36e3f99d94a6c3d9900fa01ee72e/raw/sawyer_packages.rosinstall
wstool update
cd ..
source /opt/ros/melodic/setup.bash
catkin_make
6 Cool example projects
- Rethink customer videos
- Baxter clearing a table
- Baxter playing Connect 4
- Baxter solving a Rubik's Cube
- Controlling Baxter with Razer Hydra and Oculus Rift
- Example of visual servoing
- Baxter teleop with Phantom Omni
- Baxter dual-arm force control
- Video Rethink made of our Baxter demos
- Baxter Dual Arm Manipulation a project from an MSR student in 2014
- Baxter part sorting by weight a project from this course in 2014
- Baxter stocking stuffer a project from this course in 2014
- Baxter setting a table project from 2016
- Baxter the barista project from 2016
- Baxter playing checkers project from 2016
- Baxter shell game project from 2016
- Kinodynamic Throwing Trajectories with Baxter a project from an MSR student in 2016
- Autonomous Robot Drawing with Baxter and Sawyer
- Active Learning of Dynamics and Data-Driven Control featuring Sawyer
