Linux Introduction
Table of Contents
1 General Introduction
Linux is nothing more than an operating system. It provides all of the standard tools that an end user needs to run behind-the-scenes: an interface to the processor, resource allocation, memory management, file manipulation, process control, etc. Through the years it has also developed many of the utilities that modern computer users have come to expect: graphical interface, photo/video editing, media playback, internet browsing. So in some sense, it is no different from Windows or OS X. However, Linux distinguishes itself from the standard OS variants in several key ways:
- Linux is an open operating system that is developed collaboratively
- All of the source code is available for anyone to see and to contribute to
- Because of the open nature, there are many user-packaged Linux distributions
available
- Nearly all of them are free
- The very structure of the OS and the power granted to the users allows much
easier access to the very lowest level of a computer
- One of the primary reasons that Linux shows up in robotics so often
Linux is broken up into several different layers. Many of which will be discussed in further detail later on in this document. The main components of Linux are as follows:
- Kernel The kernel is the most fundamental part of the operating system as a whole. It is responsible for managing the processes, memory, and hardware. User's don't interact with the kernel directly.
- Operating System Special tools have been written that allow users to communicate with the kernel. These tools combined with the kernel itself form the actual operating system. All other pieces of the Linux world are extra features. Many of the commands that we will cover in the last section are the tools that the user has to interact with the Kernel.
- Environment Often, what people think of when they think of an OS is really not the OS, but rather the environment used by the OS. Anyone can look at a running Windows instance and tell immediately recognize it is not OS X. The environment is the windowing system and GUI that the user is most often using when they are running the OS. Many Linux instances have no windowing system or desktop environment e.g. think about the computer in your refrigerator. Linux does not tie users to a single windowing system or desktop environment. However, virtually all Linux computers run the X Window System for a windowing system. The desktop environment sits on top of the windowing system and provides the main look and feel for the user. There are many components to the desktop environment (window managers, display managers, default applications, window decorators, etc.), and there are many different desktop environments used in Linux. The most commonly used variants are GNOME, KDE, and Xfce. With 18.04 Ubuntu switched back to using GNOME as its primary graphical shell (instead of Unity). Differentiating between the components of an environment, and from environment to environment can be quite confusing. Don't worry about it too much. Just be aware that there are several different environments, and that you are using GNOME.
- Applications These are all of the programs that a user typically uses: browsers, media players, etc.
- Distributions A Linux distribution is the highest level abstraction of Linux Common distributions are Ubuntu, Fedora, Debian, and Arch. A distribution typically includes a particular variant of the Kernel, a default environment, and many built-in packages and applications.
For more about the history and general concepts behind Linux, I'd recommend reading What is Linux? on the Linux Foundation's official site.
1.1 Document description
This document provides a high level description of the concepts that I most often see people needing to know as they begin learning software development. Really the document is broken into two main parts. Every section except the last section describes some of the concepts associated with Linux, while the final section describes specific commands that are useful for interacting with many of concepts presented. Without context, it is often quite difficult to understand why any of these concepts or commands matter. Studying this document is certainly useful, but you are not really going to learn Linux until you really start diving in and doing things. As you encounter problems you'll slowly expand your understanding of both Linux concepts and of the utilities and tools for dealing with the concepts. My hope with this document is to at least let you see some of the concepts and commands that you are likely to encounter. This way, when you do run into an issue you will at least have a better shot at knowing what to Google.
2 Communicating with the System
In this section I want to provide a brief introduction to how the user really communicates with the system. There is a lot of terminology associated with this relationship, and distinguishing between the definitions is challenging because people often use words like tty, terminal, shell, and console interchangeably. The key takeaway is that all interfacing with the kernel and the computer hardware is done through special files. It doesn't matter if you are running a program like gnome-terminal or xterm, directly logged into a text-only version of Linux (maybe a small, embedded computer like a Raspberry Pi), or connected to a Linux machine over the internet. In the end, you are going to be communicating with that terminal via one of these special files.
Typically when you are interacting with the Linux operating system you are communicating with the kernel via a tty. A tty is simply a particular file on the computer that supports reading and writing of information to/from the kernel. Back in the day there was typically only one computer and many users would be communicating with it over hardware lines each and user would be sitting at a "teletypewriter" or tty. The concept has persisted, even though in modern systems, the tty is really only a virtual connection between the kernel and the user. Although it should be pointed out that there are also ttys connecting to real-world hardware e.g. serial devices. These days, the most common definition of terminal is synonymous with a tty.
A shell is typically what the user actually uses when they are interacting with the kernel via a tty. A shell might be a text-only window that you are typing in, or it could be the way your desktop environment is communicating with the kernel. Most often in Linux, when people are talking about a shell they are specifically talking about "command-line shells". In Ubuntu the command-line shell used by default is the "Bourne-again Shell" or Bash. Note that there are many others. Further, in Ubuntu, when a user is running bash, they are typically doing so via a terminal emulator. The default terminal emulator in Ubuntu is gnome-terminal.
2.1 Bash
Bash is both a shell that allows you to interact with the kernel, but it is also a basic scripting language. As with many programming languages there are concepts of variables, conditional statement, looping, etc. In this section I want to cover some of the most common concepts that show up often in Bash.
2.1.1 Startup scripts
When a new instance of Bash is started, Bash reads and executes a set of
configuration scripts. These scripts can be used for defining functions you
may use later, setting environment variables, or running other scripts or
programs. On Ubuntu, the primary file you are concerned with is often
referred to as the "bashrc" file. It is located in your home directory
(often abbreviated with a '~'). So, for example, to view the contents of
your bashrc, you could type less ~/.bashrc or less
/home/<USERNAME>/.bashrc. To read about what order and which configuration
scripts are executed see the Bash Wikipedia page or type man bash and
navigate to the INVOCATION section.
2.1.2 Process management
To open a program in Bash, simply type the name of the program and hit
enter. Note that pressing tab several times after typing the first few
letters of a command will auto-complete the available commands. So for
example, typing ged and then pressing tab will automatically expand the
word to say gedit. Pressing enter will open the graphical text editing
program "gedit". As with many programs adding a second word after the gedit
invocation will be treated as a command-line argument to gedit. So, for
example, typing gedit test.txt will open gedit with a new text document
titled "test.txt". If the file "test.txt" already existed in the current
directory, then gedit would open the already-existing document. I typically
avoid running graphical programs from the command line because they often
will fill your terminal with unwanted messages. Also worth pointing out is
that filename extensions in Linux really don't mean anything (unlike
Windows). So you could easily name the text document test.exe or test.
Gedit always works on text documents so it knows you are trying to open a
text document. Even though the extensions really have no meaning, there are
conventions that are usually followed (*.pdf, *.jpg, *.deb, etc.), and
many programs use these conventions to their advantage (e.g. if a file ends
in .py, a text editor would likely assume this is a Python file and setup
proper Python syntax highlighting). If you were to open a document that is
not a text file, you would see the random, non-human-readable bytes that
make up that file (you would probably also get a warning that the file is a
binary file).
Notice that when you open gedit from the terminal, your terminal is no longer usable. If you go back to the terminal and try to type something, nothing happens. That is because the process started by gedit is running in the foreground. Bash has several ways to control whether processes are running or not, and whether they are running in the foreground or the background. Summarized below:
&placing an ampersand character after a command will automatically open the process in the background. You'll notice that there will be a printout that says something like[1] 1234. The first number inside of brackets indicates the "job" number of the process that was just started, and "1234" indicates the process identification (PID) of the process (more on this idea later).C-zIf you start a process in the foreground, you can make the process go to "sleep" by sending the SIGTSTP signal to the program (which tells the program to suspend its execution). This signal is sent by pressingCtrl-zwhile the terminal is focused. So, open gedit without the&at the end, go back to your terminal, and then pressC-z. You'll see a message indicating that gedit is stopped, likely something like^Z [1]+ Stopped gedit
Also notice that if you now try to type in your gedit window or use any of the buttons nothing will happen.
bgif you accidentally start a process in the foreground (and can no longer use the launching terminal), you can use thebgcommand to move the process to the background. Once in the background, you can re-use your terminal.fgIf you have either told a process to sleep (Ctrl-z) or placed it in the background withbgor an ampersand (&) you can bring it back to the foreground using thefgcommand. This can be useful for easily killing things that you have started.jobsyou can see all of the jobs that have been started by a terminal by typingjobsand hitting enter. Each job will have a unique job number associated with it; these are the numbers in brackets. Bothfgandbgcan operate directly on job numbers. So, for example, if you had 3 jobs that were all running in the backgroundfg %2would bring job number 2 to the foreground. Note that several other Linux commands also can work with job numbers (killis a good example).- The proper way to end a job that you've started in a terminal is to press
C-cwhich sends theSIGINTsignal that tells the running program to run its shutdown routine (this might include closing open files, freeing used memory, etc.). Be careful not to constantly put jobs to sleep withC-z. I've seen many students end up with dozens of paused-but-still alive programs in a single terminal because of overuse ofC-z. Likely this is because of they are working with programs that aren't shutting down properly (often because they wrote the code). If that is happening to you,C-zis not the proper workaround. You should be usingkill(discussed later) or keyboard shortcuts to sendSIGQUITsignals. - If you have a process that won't properly shutdown, you can use
C-\to send theSIGQUITsignal. This causes the process to immediately terminate and dump core. PressingC-\can be very convenient, but don't get in the habit of using it all of the time. It is a good way to end up with bad issues like zombie processes that might require computer restarts.
2.1.3 Keyboard shortcuts
Learning the basic keyboard shortcuts are one of the most effective ways of getting good at using a Bash terminal. By default, most of the keyboard shortcuts are based around those used by Emacs. The following list are my most commonly used keyboard shortcuts; I think they should be committed to memory and used all of the time. Note that the arrow keys also do help with many of these things, but then you have to leave the home keys.
Learning to quickly use the forward and reverse search (
C-sandC-r) of your command history, and proper use of TAB completion are the most valuable techniques to quickly increase your terminal efficiency.
C-a: Move cursor back to beginning of lineC-e: Move cursor to the end of the lineC-f: Forward characterC-b: Backward characterM-f: Forward wordM-b: Backward wordM-d: Kill following wordM-DEL: Kill previous word (on most keyboards, theDELkey will be labeled the Backspace key)C-u: Kill all text from cursor to the beginning of lineC-k: Kill all text from cursor to the end of the lineC-_: orC-/Undo last operationC-l: Clear the display (move text to the top of the screen)M-r: Reset current input line; undoes all changesM-u: Upcase following wordM-l: Downcase following wordM-c: Capitalize following wordC-p: Navigate to previous commandC-n: Navigate to next commandC-r: Reverse search through command historyC-s: Forward search through command history (addstty -ixonto your~/.bashrcto make this work). Read why here.C-y: Yank text (paste whatever was last killed)M-y: Cycle through kill ringM-\: Clear space on both sides of cursorC-c: Send SIGINT to foreground process… shutdown processC-d: Send EOF to foreground process… allows exit from things that spawn other terminals (Python and ssh are good examples of this).C-z: Send SIGTSTP to foreground process… suspends execution of processC-\: Send SIGQUIT to foreground process… terminate process without running shutdown routines
2.1.4 Copy and paste tips
Using copy and paste in terminals can be tricky sometimes. For one, C-c
and C-v are already used by other Bash shortcuts. Usually you can copy
and paste into/from terminals by right-clicking the mouse or using C-S-v
and C-S-c. You can also use S-insert (shift and insert key) to paste,
and I often find this to be a more reliable key-chord for pasting, and it
works in almost all programs. Additionally, if you highlighted something
with your mouse, even if you didn't copy it, you can usually paste it by
middle clicking.
Note that there are multiple "clipboards" in your system and occasionally you'll end up copying/pasting from the wrong clipboard. For example, tools like Emacs, Bash, tmux, and your mouse all have separate clipboards. Sorting out how to get all of these working together correctly can be a bit tricky. Things generally "just work", but if you find yourself repeatedly pasting the wrong thing into a particular program, it is probably worth a Google, as there is likely a good solution.
2.1.5 Aliases
Bash supports aliasing commands; you can write your own commands and define
special words that go along with them. This is a great way to re-define
complex commands that you find yourself using a lot. Typing the word alias
will list all aliases that are currently defined in your system. Note that
the built-in bashrc in Ubuntu automatically looks for a file called
.bash_aliases in the home directory. If it exists, that file is also
executed during Bash invocation. Also note that Ubuntu has a variety of nice
aliases defined out-of-the-box. They are very easy to create – here are some examples from my personal alias file.
2.1.6 Environment variables
Environment variables are a set of dynamic variables that control how programs behave. Common examples include things like
- Telling a compiler where to search for dependent libraries
- Telling Python where to search for modules
- Controlling which workspace is "active" in ROS
- Telling Bash where to look for executable files that you can run
Ubuntu will always define some environment variables in scripts that are run
while booting, others are set in user-specific scripts (e.g. ~/.bashrc).
Environment variables are set using the export command from Bash, and
unset using the unset command. Try running the following snippet.
echo "Environment variable FOOVAR = ${FOOVAR}"
export FOOVAR=/home/user/bin
echo "Environment variable FOOVAR = ${FOOVAR}"
export FOOVAR=$FOOVAR:/usr/local/lib
echo "Environment variable FOOVAR = ${FOOVAR}"
env |grep FOOVAR
unset FOOVAR
echo "Environment variable FOOVAR = ${FOOVAR}"
2.1.7 Miscellaneous features
Globbing - Globbing is another name for filename expansion. Basically, this is when Bash recognizes and expands wild cards. To see several examples, examine and run the following code snippet (note that lines with comments can still be directly pasted into a Bash shell):
cd # change directory to home directory
mkdir test_dir # make a temp directory
cd test_dir
# create a few dummy files:
touch file1 file2 file 3 file_a file_b file_c image1.jpg image2.jpg im3.jpg
# print out the files in a variety of different ways
ls -l
ls -l *1*
ls -l im?.jpg
ls -l im*.jpg
ls -l file[1-2]*
ls -l [^f]*[0-9]*
ls -l {f*_[a-z]*,*.jpg}
This idea of globbing works for many standard bash functions, and it is often an easy way to script complex operations. For example, it is trivial to use a Bash for-loop to operate on a list of files that match a globbed expression. Here's a simple example of renaming some files (note this particular operation could have been done with the
renamecommand):jarvis@test2018:~/test⟫ touch image1.JPG image2.JPG image3.JPG jarvis@test2018:~/test⟫ ls image1.JPG image2.JPG image3.JPG jarvis@test2018:~/test⟫ for i in *.JPG; do mv $i ${i%.JPG}.jpg ; done jarvis@test2018:~/test⟫ ls image1.jpg image2.jpg image3.jpg
Piping- A Pipe is a simple way to feed the output of one program directly into the input of another program. Let's illustrate a few examples:
# print environment variables and then search for instances of the word PATH:
env |grep PATH
# print the messages that have been produced by the kernel log and view :
# them in the "less" pager program (press 'q' to quit)
dmesg | less
# pipes can also be chained:
dmesg | grep init | less
# count all of the files matching a certain name:
ls *.jpg |wc -l
If it isn't obvious, the '|' symbol is what indicates the pipe. Note that some commands require a special argument to indicate that they are supposed to read from a pipe. An example of this is the
tarprogram. Check out the following example from the Dropbox headless install instructions:cd ~ && wget -O - "https://www.dropbox.com/download?plat=lnx.x86_64" | tar xzf -
The '-' at the very end of the command is telling
tarto read input from the output ofwget(which is downloading files from a website).- Condition testing and iteration - Getting into detail on these topics is a bit out of scope, just note that it is easy to write loops and conditional statements in Bash. If there is any task that you find yourself doing repeatedly, it may be worth it to write a simple Bash script instead.
I/O redirection - In a running instance of Bash, There are always three default files open – remember that our interaction with the kernel is through special files? – stdin (the keyboard), stdout (the screen), and stderr (error messages output to the screen). I/O redirection allows you to manipulate the input and output to these files to communicate with input and output of other files and processes.
# A very common use case is to direct some logging information to a file
# instead of to the screen. The following command prints out the history of
# calls to the "apt-get" command, and then pipes the contents to "grep".
# Grep searches for the string "Start-Date" and prints all lines that match
# plus one line after a match.
cat /var/log/apt/history.log |grep -A 1 Start-Date
# We can modify this slightly with an output redirection:
cat /var/log/apt/history.log |grep -A 1 Start-Date > ~/apt_history_log.log
# The following commands illustrate a few other examples:
jarvis@test2018:~/Desktop⟫ echo "first_message" > testfile.txt
jarvis@test2018:~/Desktop⟫ cat testfile.txt
first_message
jarvis@test2018:~/Desktop⟫ echo "second_message" > testfile.txt
jarvis@test2018:~/Desktop⟫ cat testfile.txt
second_message
jarvis@test2018:~/Desktop⟫ # note that the '>' is overwriting the contents of the 'testfile.txt'
jarvis@test2018:~/Desktop⟫ echo "third_message" >> testfile.txt
jarvis@test2018:~/Desktop⟫ cat testfile.txt
second_message
third_message
jarvis@test2018:~/Desktop⟫ # The '>>' is appending to 'testfile.txt'
3 File System
3.1 Filesystem Hierarchy Standard
Knowing all of the details of the Filesystem Hierarchy Standard (FHS) is not
a huge deal. What is important is knowing that the FHS exists and there are
standard places for files to go. The most important thing to note is that
everything that is not in your home directory (typically
/home/<USERNAME>/) has an important purpose to some installed package or
built in feature. Use caution when editing anything outside of your home
directory. A corollary to that statement is that all of your files and work
should go in your home directory.
For reference, I've reproduced the Main Directories section of the Linux
Filesystem Tree Overview page on help.ubuntu.com.
/bin- is a place for most commonly used terminal commands, like ls, mount, rm, etc.
/boot- contains files needed to start up the system, including the Linux kernel, a RAM disk image and bootloader configuration files.
/dev- contains all device files, which are not regular files but instead refer to various hardware devices on the system, including hard drives.
/etc- contains system-global configuration files, which affect the system's behavior for all users.
/home- home sweet home, this is the place for users' home directories.
/lib- contains very important dynamic libraries and kernel modules
/media- is intended as a mount point for external devices, such as hard drives or removable media (floppies, CDs, DVDs).
/mnt- is also a place for mount points, but dedicated specifically to "temporarily mounted" devices, such as network filesystems.
/opt- can be used to store additional software for your system, which is not handled by the package manager.
/proc- is a virtual filesystem that provides a mechanism for kernel to send information to processes.
/root- is the superuser's home directory, not in home to allow for booting the system even if home is not available.
/run- is a tmpfs (temporary file system) available early in the boot process where ephemeral run-time data is stored. Files under this directory are removed or truncated at the beginning of the boot process. (It deprecates various legacy locations such as /var/run, var/lock, /lib/init/rw in otherwise non-ephemeral directory trees as well as /dev.* and /dev/shm which are not device files.)
/sbin- contains important administrative commands that should generally only be employed by the superuser.
/srv- can contain data directories of services such as HTTP (srv/www) or FTP.
/sys- is a virtual filesystem that can be accessed to set or obtain information about the kernel's view of the system.
/tmp- is a place for temporary files used by applications.
/usr- contains the majority of user utilities and applications, and partly replicates the root directory structure, containing for instance, among others, usr/bin and /usr/lib.
/var- is dedicated to variable data, such as logs, databases, websites, and temporary spool (e-mail etc.) files that persist from one boot to the next. A notable directory it contains is /var/log where system log files are kept.
3.3 Everything is a File
Basically everything in Linux is treated as a file. This includes interfaces to hardware, all configurations, everything. Here are a few notes about files in general:
- Hidden Files Files with a "." as the first character are "hidden files". A normal call
to
lswill not display them. Usels -ato see hidden files. They are normally reserved for configuration files and directories. - Extensions Extensions in Linux don't really matter (unlike Windows). You
are free to name your files anything you want. However, it is completely
reasonable and recommended to stick with common conventions. For example,
always end filenames of PDF files with ".pdf", JPEG files end with ".jpg",
ZIP files end with ".zip", etc. Try not to use capital letters in
extensions (Linux always prefers
filename.jpgoverfilename.JPG). - Naming Conventions Most people in Linux will avoid putting the following
characters in filenames or directories: spaces, colons (
:), ampersands (&), and quotes (" or '). Technically, for maximum guarantee that your filenames won't cause any conflicts with Linux programs you should only use the characters defined in the POSIX Portable Filename Character Set (basically only alphanumeric characters plus.,_, and-). Also, DO NOT start filenames with a dash (-), and only start them with a.if you really want them to be hidden files. - Terminal coloring The colors that are displayed in your terminal (at
least in an unaltered Ubuntu installation) are useful for telling you
attributes of files. For example, directories are always blue, executable
files are always green, mp3 files are aqua, etc. If you stick to the nice
naming conventions, your colors will always tell you something nice. The
command
dircolors --print-databasewill print all of the contents of the$LS_COLORSenvironment variable. This is what actually controls the coloring. However that is not a very useful way to view what the colors are. The following snippet (borrowed from here) will print out all of the colors as well as descriptions of what type of file they are:
eval $(echo "no:global default;fi:normal file;di:directory;ln:symbolic link;pi:named pipe;so:socket;do:door;bd:block device;cd:character device;or:orphan symlink;mi:missing file;su:set uid;sg:set gid;tw:sticky other writable;ow:other writable;st:sticky;ex:executable;"|sed -e 's/:/="/g; s/\;/"\n/g')
{
IFS=:
for i in $LS_COLORS
do
echo -e "\e[${i#*=}m$( x=${i%=*}; [ "${!x}" ] && echo "${!x}" || echo "$x" )\e[m"
done
}
- Linking The Linux filesystem supports both hard and soft (or symbolic) links – soft links are far more common. A symbolic link is basically just a file that is actually just a reference to a different file. See the following snippet:
cd ~/Desktop/
echo "Hi there!" > source_file.txt
cd ~/Documents/
# create two symbolic links to the source_file.txt we just created using
# two different names:
ln -s ~/Desktop/source_file.txt
ln -s ~/Desktop/source_file.txt sym_file.txt
# print file attributes:
ll
# look at link contents:
cat sym_file.txt
cat source_file.txt
# you can even link to directories:
ln -s ~/Desktop/ dirlink
ll
cd dirlink
pwd
ls
cat sym_file.txt
- Home directory A user's home directory is a place for them to have full
access to everything – it is where all of their files go. By default it is
located in
/home/<USERNAME>/. In Ubuntu it can be controlled by the environment variable$HOME(although there is no need to change it). The symbol~is typically just a shortcut for the current user's home directory. This symbol can be changed with the$HOMESYMenvironment variable. There are many hidden directories in your home directory that contain user-specific configurations and settings for many of the programs on your machine.
3.4 File Permissions
As a security measure, when using Linux, every file has a set of attributes
related to ownership and permissions. These attributes are stored at the
filesystem level, and they control who is allowed to do what with any given
file. Every file has two types of owners, a single user owner and a group
owner. Groups are simply collections of zero or more users. One user may
belong to many groups. The /etc/group/ file describes all of the groups on
your system, and who belongs to them. To see which groups the current user
belongs to, simply type groups in a terminal.
When talking about permissions for a particular user and a particular file, there are three ownership situations that can occur
- The user is the owner of the file
- The user belongs to the group that owns the file
- The user is not the owner, and does not belong to owning group
Each of these three cases has a separate set of permissions associated with them. Permissions for each case are defined by three characters. Thus there are a total of 9 fields completely defining the permissions for a file. The three characters for a given situation are as follows
- First character:
rimplies the file is readable;-the file is not readable - Second character:
wimplies the file is writable;-the file is not writable - Third character:
ximplies execution is permitted;-execution is not permitted. This third character can also define thesetuidandsetgidattributes. The details of these attributes are beyond the scope of this introduction, but note that you may seesortcharacters in this slot.
The 9 permissions attributes are lined up in order of the three cases from
above. Permissions for a file can be seen using ls -l.
To better understand this, let's analyze a few examples:
rwxrwxrwx~ File is readable, writable, and executable for all usersrwxr--r--~ File is readable, writable, and executable for the file owner. Members of the owning group and all other users can read the file but they cannot write or execute the file.rw-rw----~ File is readable and writable by user owner and group owner, but not executable by either. All others cannot read, write, or execute.
Also note that when using ls -l, there is a single character listed before
the file permissions (visible in the below figure). This character represents
the Unix file type. There are several special types of files (directories,
symbolic links, pipes, etc.) that will sometimes have this first character
specified. Also note that passing -F turns on the --classify option to
ls which according to the man page turns on the option that "append
indicator (one of */=>@|) to entries". On your system, you likely have a
built in alias l that automatically turns this option on. Read more about
these symbol indicators on this Ask Ubuntu answer.
Several more examples are shown in the image below:
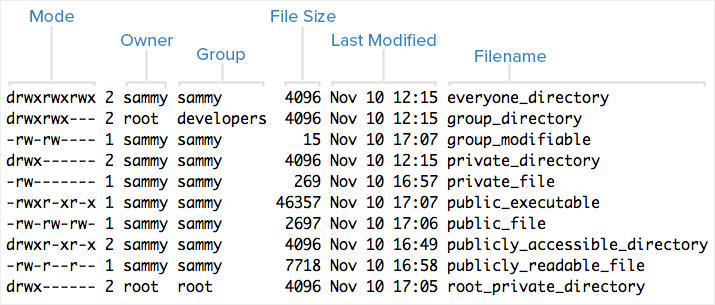
Figure 1: Example output of ls -l with annotations. Borrowed from here: https://www.digitalocean.com/community/tutorials/an-introduction-to-linux-permissions
The primary command line tools used for editing file permissions are chmod,
chown, and chgrp. See below for some illustrations of the effects of
permissions and examples of modifying permissions and ownership.
jarvis@sarlacc:~⟫
jarvis@sarlacc:~⟫ cd Desktop/
jarvis@sarlacc:~/Desktop⟫ mkdir illustrate_permissions
jarvis@sarlacc:~/Desktop⟫ cd illustrate_permissions/
jarvis@sarlacc:~/Desktop/illustrate_permissions⟫ l
jarvis@sarlacc:~/Desktop/illustrate_permissions⟫ mkdir tmp
jarvis@sarlacc:~/Desktop/illustrate_permissions⟫ touch file1.txt
jarvis@sarlacc:~/Desktop/illustrate_permissions⟫ touch file2.txt
jarvis@sarlacc:~/Desktop/illustrate_permissions⟫ ll
total 12K
drwxrwxr-x 3 jarvis jarvis 4.0K Sep 13 16:42 ./
drwxr-xr-x 4 jarvis jarvis 4.0K Sep 13 16:42 ../
-rw-rw-r-- 1 jarvis jarvis    0 Sep 13 16:42 file1.txt
-rw-rw-r-- 1 jarvis jarvis    0 Sep 13 16:42 file2.txt
drwxrwxr-x 2 jarvis jarvis 4.0K Sep 13 16:42 tmp/
jarvis@sarlacc:~/Desktop/illustrate_permissions⟫ chmod a+x file1.txt
jarvis@sarlacc:~/Desktop/illustrate_permissions⟫ ll
total 12K
drwxrwxr-x 3 jarvis jarvis 4.0K Sep 13 16:42 ./
drwxr-xr-x 4 jarvis jarvis 4.0K Sep 13 16:42 ../
-rwxrwxr-x 1 jarvis jarvis    0 Sep 13 16:42 file1.txt*
-rw-rw-r-- 1 jarvis jarvis    0 Sep 13 16:42 file2.txt
drwxrwxr-x 2 jarvis jarvis 4.0K Sep 13 16:42 tmp/
jarvis@sarlacc:~/Desktop/illustrate_permissions⟫ chmod o-r file2.txt
jarvis@sarlacc:~/Desktop/illustrate_permissions⟫ ll
total 12K
drwxrwxr-x 3 jarvis jarvis 4.0K Sep 13 16:42 ./
drwxr-xr-x 4 jarvis jarvis 4.0K Sep 13 16:42 ../
-rwxrwxr-x 1 jarvis jarvis    0 Sep 13 16:42 file1.txt*
-rw-rw---- 1 jarvis jarvis    0 Sep 13 16:42 file2.txt
drwxrwxr-x 2 jarvis jarvis 4.0K Sep 13 16:42 tmp/
jarvis@sarlacc:~/Desktop/illustrate_permissions⟫ sudo chown jarvis:video tmp/
[sudo] password for jarvis:
jarvis@sarlacc:~/Desktop/illustrate_permissions⟫ ll
total 12K
drwxrwxr-x 3 jarvis jarvis 4.0K Sep 13 16:42 ./
drwxr-xr-x 4 jarvis jarvis 4.0K Sep 13 16:42 ../
-rwxrwxr-x 1 jarvis jarvis    0 Sep 13 16:42 file1.txt*
-rw-rw---- 1 jarvis jarvis    0 Sep 13 16:42 file2.txt
drwxrwxr-x 2 jarvis video  4.0K Sep 13 16:42 tmp/
jarvis@sarlacc:~/Desktop/illustrate_permissions⟫ groups
jarvis adm cdrom sudo dip plugdev fuse lpadmin sambashare
jarvis@sarlacc:~/Desktop/illustrate_permissions⟫ chmod og-rw tmp/
jarvis@sarlacc:~/Desktop/illustrate_permissions⟫ ll
total 12K
drwxrwxr-x 3 jarvis jarvis 4.0K Sep 13 16:42 ./
drwxr-xr-x 4 jarvis jarvis 4.0K Sep 13 16:42 ../
-rwxrwxr-x 1 jarvis jarvis    0 Sep 13 16:42 file1.txt*
-rw-rw---- 1 jarvis jarvis    0 Sep 13 16:42 file2.txt
drwx--x--x 2 jarvis video  4.0K Sep 13 16:42 tmp/
jarvis@sarlacc:~/Desktop/illustrate_permissions⟫ cd tmp/
jarvis@sarlacc:~/..2../illustrate_permissions/tmp⟫ ls
jarvis@sarlacc:~/..2../illustrate_permissions/tmp⟫ cd ..
jarvis@sarlacc:~/Desktop/illustrate_permissions⟫
jarvis@sarlacc:~/Desktop/illustrate_permissions⟫ l
file1.txt*  file2.txt  tmp/
jarvis@sarlacc:~/Desktop/illustrate_permissions⟫ ll
total 12K
drwxrwxr-x 3 jarvis jarvis 4.0K Sep 13 16:42 ./
drwxr-xr-x 4 jarvis jarvis 4.0K Sep 13 16:42 ../
-rwxrwxr-x 1 jarvis jarvis    0 Sep 13 16:42 file1.txt*
-rw-rw---- 1 jarvis jarvis    0 Sep 13 16:42 file2.txt
drwx--x--x 2 jarvis video  4.0K Sep 13 16:42 tmp/
jarvis@sarlacc:~/Desktop/illustrate_permissions⟫ chmod u-rw tmp
jarvis@sarlacc:~/Desktop/illustrate_permissions⟫ ll
total 12K
drwxrwxr-x 3 jarvis jarvis 4.0K Sep 13 16:42 ./
drwxr-xr-x 4 jarvis jarvis 4.0K Sep 13 16:42 ../
-rwxrwxr-x 1 jarvis jarvis    0 Sep 13 16:42 file1.txt*
-rw-rw---- 1 jarvis jarvis    0 Sep 13 16:42 file2.txt
d--x--x--x 2 jarvis video  4.0K Sep 13 16:42 tmp/
jarvis@sarlacc:~/Desktop/illustrate_permissions⟫ cd tmp/
jarvis@sarlacc:~/..2../illustrate_permissions/tmp⟫ l
ls: cannot open directory .: Permission denied
2 jarvis@sarlacc:~/..2../illustrate_permissions/tmp⟫ cd ..
jarvis@sarlacc:~/Desktop/illustrate_permissions⟫ ls
file1.txt  file2.txt  tmp
jarvis@sarlacc:~/Desktop/illustrate_permissions⟫ ll
total 12K
drwxrwxr-x 3 jarvis jarvis 4.0K Sep 13 16:42 ./
drwxr-xr-x 4 jarvis jarvis 4.0K Sep 13 16:42 ../
-rwxrwxr-x 1 jarvis jarvis    0 Sep 13 16:42 file1.txt*
-rw-rw---- 1 jarvis jarvis    0 Sep 13 16:42 file2.txt
d--x--x--x 2 jarvis video  4.0K Sep 13 16:42 tmp/
jarvis@sarlacc:~/Desktop/illustrate_permissions⟫ chmod a-rw file2.txt
jarvis@sarlacc:~/Desktop/illustrate_permissions⟫ ls
file1.txt  file2.txt  tmp
jarvis@sarlacc:~/Desktop/illustrate_permissions⟫ cat file2.txt
cat: file2.txt: Permission denied
1 jarvis@sarlacc:~/Desktop/illustrate_permissions⟫ echo
jarvis@sarlacc:~/Desktop/illustrate_permissions⟫ echo "test" > file2.txt
bash: file2.txt: Permission denied
1 jarvis@sarlacc:~/Desktop/illustrate_permissions⟫
4 Commands
4.1 Basic commands
./and hashbangs: Prepending a./to the name of an executable script allows the script to be executed. For example./scriptname.shwould execute the scriptname.sh script located in the current working directory. If the file is machine code that has been compiled, it will execute fine. If it is a script meant to be read by an interpreter (Python, Bash, PHP), then the first two characters of the script should be#!aka a hashbang or shebang. The purpose of this line is to tell the OS which interpreter should run this script.- apropos: This program searches manual pages and descriptions. It can be
an awesome way to discover commands based on category. For example typing
apropos networkwill print out a big list of manual pages that mention networking. - cat, tail, head: These programs are for printing out all or parts of
files.
catprints the entire contents of a file,headprints the first 10 lines, andtailprints the last 10 lines. - cd: Change directory. Note that this command doesn't have a man page
because it is a "builtin" (use
help cdto learn more aboutcd). You can usecd ..to navigate to the current directory's parent, and you can usecd -to navigate to the previous directory you were in. - chgrp: Modify the group ownership of a file.
- chmod: Modify the permissions of a file.
- chown: Modify the group and user ownership of a file.
- curl/wget: These two programs are for downloading things off of the internet.
- echo: Write arguments to stdout i.e. print to the terminal.
- env: Technically this command is for running programs in a modified
environment. However, it is most often used for printing out the
environment by just typing
envwith no arguments. - export: This is used to set environment variables e.g.
export
       PATH=/home/user/bin:$PATH
would prepend thePATHenvironment variable with/home/user/bin. - file: This command can be used for determining file type.
- hostname: Used for showing or setting the system's host name.
- less: This is a lightweight, very fast pager. It is very useful for
quickly opening up and searching through files. Some commands will open
their output in
lessby default (e.g.man). So it is a good idea to learn some of the shortcuts used byless(which are based invi). Pressqto quit and presshto see all of the shortcuts. Note that the packagesource-highlightcan be combined withlessto ensure that source code opened inlessis nicely highlighted. - locate (updatedb):
locateis used for finding files that are located all over your system. It does this very quickly by reading out of a database containing a map of your filesystem (rather than directly reading the disk). Theupdatedbcommand will force an update to the database. If you want to search for recently added files you'll want to runsudo updatedbbefore usinglocate. - ls: List directory contents. Most common usages are
lsto just show files,ls -CFto arrange by column and append special symbols to indicate links, directories, pipes, etc. (aliased tolby default on Ubuntu), andls -alFhto show detailed permissions for all files (aliased tollby default). - lsb_release: Print information about your Linux distribution. Usually
used with
lsb_release -a. - man: View the manual for a given program. There are many searching and
sorting options, but the most common usage is to simply type
man
       PROGRAMNAME
. For example,man lswould open the manual forls. Some programs have more than one man page (e.g.printf). See the DESCRIPTION page of the man manual (typeman man) to see how duplicate man pages are categorized. Use-ato see all of the man pages e.g.man -a printf. - nano: A very simple terminal-based text editor. It is a bit hard to use, but you should know some of the basics to help out in a situation where you are forced to edit files on a computer with no graphics or without your favorite text editor.
- pwd: Print the current working directory. Useful for scripting.
- source: Usage is
source FILENAME. The source command executes the commands from FILENAME in the current shell. I like to think of this as taking the contents of FILENAME and copy-pasting them into my current terminal. - strings: Prints human readable characters from files. Can be useful for searching through compiled code looking for something interesting.
- sudo: This command lets you execute a command as a different user. By
far the most common usage is to execute a command as the
superuserto receive elevated permissions e.g.sudo apt-get update. - top: Top is used for displaying Linux processes including information
about CPU and memory usage. An even better version is
htopalthough it is not installed by default. - uname -a: Print information about machine and operating system. Most
commonly used as
uname -a. - w: Show who is logged in and what they are doing. Useful when sharing a machine over the internet.
- wc: This allows you to count newlines, words, or bytes in a file.
Combined with a pipe it is useful for counting things like the number of
files in a directory
ls |wc -l. - whereis: Locate the binary, source, and man pages for a command. Useful for figuring out if you have multiple versions of something installed.
- which: This returns the pathname of a file that would have been executed in the current environment. Useful for figuring out which version of a package will be executed (if multiple versions are installed).
- whoami: Print current user name.
4.2 Advanced commands
- ag/ack: These are two very powerful text searching tools specifically
designed for programmers.
ackhas a better interface for searching file types associated with a specific language;agis much faster. Both need to be installed extra. Ubuntu package names areack-grepandsilversearcher-ag. - awk/sed: These are both extremely powerful mini-programming languages for editing and searching text. Example applications include command-line code refactoring, complex file renaming, and extraction of data. They are both challenging to learn. I recommend not trying to learn them until you have a specific application. Instead, just keep the existence of each in the back of your mind.
- cut: This is used for removing specific sections from each line of a file. Very useful for extracting information from command output. For example, let's say you wanted to get your IP address in a Bash script.
- dmesg: This prints the kernel ring buffer. Basically it prints the
contents of every major operation that the kernel has done since booting.
Combined with
greporless, this is a very powerful tool for debugging hardware issues. - find: This is one of my most used commands. Much like
locate,findis for finding files. Unlike locate,findspecifically searches the filesystem (rather than a database). As a result it is much slower; you'll usually want to restrict find to searching a somewhat narrow directory structure. Even though it is slower,findhas some amazing utilities. You can find files created within date ranges, you can find files within a range of file sizes, you can find special file types, you can search for names using globbing or regular expressions, and more. One of the best features is that you can operate on each found file using the-execswitch. So for example, let's say you wanted to recursively find all.mp3files in some complex directory structure and then copy each file to a different directory, this would be trivial with find. - grep: This tool is specifically for searching through text. Every Linux
user should know some basics of
grep. It is useful for searching through code, scanning the output of tools likefind,dmesg, andenv, and more. It is included in every Linux distribution. In its basic usage,grepis not very complicated. The real power ofgrepcomes when you begin to understand regular expressions. - jobs: This prints out the currently running jobs from a given Bash
terminal. The job numbers can be used with tools like
killin place of a process ID (PID); just prepend the job number with a%. - kill, killall: These are the primary tools for sending Unix signals to
running programs. My primary usage of
killiskill -9 <PID>. The-9indicates that we want to send the SIGKILL signal to the process specified byPID.killallallows you to operate on names instead of PID. That is nice because you don't first need to look up the PID of a process.killallshould be used with caution because you can easily shutdown processes that you didn't mean to shutdown. - lspci: List all PCI devices.
- lsusb: List all USB devices.
- modprobe/rmmod/lsmod: The Linux kernel is not necessarily a single,
monolithic piece of code. Different distributions compile their kernels
with different features built-in. But what if your distribution compiled
a kernel that left out the drivers for a piece of hardware that you are
trying to use? This is where kernel modules come in. The kernel supports
adding and removing useful pieces on demand. Example kernel modules in
Ubuntu include wi-fi drivers, USB enumeration tools, and many more. Most
of the time, the module you need is loaded by default, or set to load
automatically when you install a package that provides a kernel module.
These three commands are useful for debugging situations where the kernel
modules are not performing as you would like.
modprobeis how you insert a module to the kernel,rmmodis how you remove a module from the kernel, andlsmodshows the status of modules in the kernel. The definitive resource on modules is here. - mount/umount: If you want to use a filesystem, it must first be "mounted". That is, it must be attached to your current accessible filesystem. Often this is done automatically. When you boot your computer, the main Linux install filesystem is mounted during start-up. When you plug a USB flash drive into your computer, on Ubuntu, it is typically mounted automatically. These two commands are how you manually control mounting and unmounting if things don't happen automatically. You likely won't need them much, but you should know they exist.
- ps, pgrep: These are the primary command line tools for discovering
information about running processes on your computer.
psis the base, very powerful command, andpgrepallows quick searching. I almost always setpsto display all running processes, and then search through the output usinggrepe.g.ps aux |grep pythonwould show all processes that mention python in their ps output.pgrepallows you to directly search by name e.g.pgrep python. While this is often more convenient thanps, it is more likely to miss the processes that you are looking for. Also note, its default printout only shows PID so it is difficult to tell what each PID really is. - rename: This is a great utility for renaming files using regular
expressions. Let's say you were in a directory with a bunch of mp3 files,
and you wanted to convert all spaces to
_. We could do that withrename 's/\ /_/g' *.mp3. - rsync: This is a very powerful tool for copying files both locally and
over the internet. It supports cool features like remote deleting, backup
files, transfer compression, and directory mirroring via the
rsync
       daemon
. If you masterrsyncyou can ditch Dropbox! - sort: This is used for sorting lines of text files. Useful for producing nicely formatted output from a variety of command line tools.
- tar: These days,
taris primarily used for creating and extracting archives (zip, gz, bz2, etc.). To compress all .mp3 files into a bz2 archive I usetar cfj album.tar.bz2 *.mp3. To extract nearly any archive, I usetar xvf FILENAME. Note that zip/unzip are separate programs discussed below. - watch: This command is useful for repeatedly running a command based on
a timer. I most commonly find myself using this to continually inspect
the output of
dmesgas I'm trying to debug hardware problems. The command I use is usually something likewatch -n 0.2 "dmesg |tail -n 20" - xargs: This is tool is somewhat confusing when you read the man page.
However, I find its real-world application is nearly always the same.
Let's say I have some command that is producing lines of output, and I
want to do something to each of those lines. Then I can pipe the output
of the original command to
xargsto accomplish this. As an example, let's say I want to usefindto find a bunch of source code files, and then search for a particular string in each of the files.find /usr/include -maxdepth 1 -name "*.h" |xargs grep "isinf"The part before the pipe (|) is searching/usr/include/for all C header files. The-maxdepth 1indicates that it should only search in the/usr/include/directory and no subdirectories. On my machine this produces 436 files. Thenxargsis combined withgrepto search for the stringisinfin every single file returned by find. - zip/unzip: These are tools for zipping and unzipping .zip files. To
zip, I use
zip -r album.zip *.mp3and to unzip I useunzip album.zip. You can specify what directory to unzip to with the-dargument.
4.3 Miscellaneous Command Line tools
- apt-cache: This tool is used for searching for packages, and retrieving
information about packages (such as dependencies) that are available in
your
aptsources i.e. packages that can be installed viaapt-get. - apt-file: This is a great tool for determining what package must be
installed to provide a particular file. So for example, let's say I was
trying to compile something that depended on the library
/usr/lib/python2.7/dist-packages/cv2.so, and I was getting a warning that the compiler/linker could not find that .so file. Then I could runapt-file search /usr/lib/python2.7/dist-packages/cv2.soto see that the package I'm missing ispython-opencv. - apt-get: This is the primary way you should be installing and uninstalling packages on your machine.
- dpkg:
dpkgis the package manager for Debian (the Linux distribution that Ubuntu is based on).apt-getdoes all of the things thatdpkgdoes, but it also has the ability to download packages from the internet.dpkgis useful for situations where you download .deb files from the internet manually and you need to install them. I also often use it for seeing which packages I already have installed. - htop/top:
topis the simple tool for displaying Linux processes and their CPU/Memory consumption.htopmust be installed, but it is a much more feature-rich version oftop. - ifconfig/iwconfig: These are tools for viewing your network configuration.
- ping: This is used for sending network requests to hosts. I often use this while debugging network problems.
- pip: This is the primary interface you will use to PyPi - the Python
Package Index.
pipallows you to download and install Python packages and dependencies from the internet. In general,apt-getshould be the first place you look for Python packages, but you can turn topipif a desired package is not available onapt-getor if the version available is incompatible with your needs. - screen/tmux/byobu:
screenandtmuxare all terminal multiplexers. They allow you to run multiple terminals inside of a single terminal. Learning how to use one/both of these is incredibly valuable for situations where you are remotely logged onto a computer that has no graphics capabilities.tmuxis more modern, and more actively developed thanscreen, butscreenhas been around forever and is more common. They are both very powerful, but without significant customization, their user interfaces leaves something to be desired.byobuis a relatively new package that aims to provide a nice-looking and easy-to-use interface to eitherscreenortmuxregardless of which one you use. I usebyobualmost all of the time. - ssh:
sshis a tool for logging into a remote machine and executing commands on that machine. It supports modern encryption tools, window forwarding, and it can be used as a communication backend for tools like Git and rsync.
4.4 Useful programs
The following list contains a variety of programs that I find useful on Linux.
4.4.1 Media
- ImageMagick: This is a very powerful command-line based image-editing tool. Can convert between pretty much any image format.
- VLC: This is a great video and music player that works just like the Windows/Mac versions.
- mplayer: This is a very powerful command-line based movie player on Linux. I often use this when I want to pop up a movie very quickly
- libav/ffmpeg: These are the best command-line video editors. They may
seem a bit intimidating to learn, but you can accomplish an amazing amount
with just a little practice. These used to be the same package, but then
some developers got in a fight and the two projects split. Directions for
one will likely work for the other. On Ubuntu, for many years they bundled
avconv, but they've now switched back toffmpeg. - eog: This is the built in image viewer in Ubuntu. If you are in the
terminal and would like to open an image you could type
eog
     image_name.jpg
. - inkscape: This is a very powerful vector graphics drawing tool. It is great for generating drawings that can be cut out on a laser cutter.
- kdenlive: Kdenlive is a full-featured video editing program in Linux.
- GIMP: This is a very powerful, free photo editing program that works great in Linux.
- shotwell: This is the Ubuntu-default photo management tool for Ubuntu.
4.4.2 General programming
- Text editors: There are a huge variety of text editors you can use. My
advice is to choose one and learn how to use it well. Editing code in a
variety of different editors is a good way to produce inconsistent
formatting. In a whitespace-sensitive language like Python, this can
result in code not running properly.
- Atom: A very nice looking, powerful, and free editor from the developers behind GitHub.
- Sublime: Similar to atom, I don't like that they always try to get you to buy the program.
- vi: One of the truly powerful text editors. I prefer Emacs, but vi definitely has its merits. vi is very lightweight, included in all Linux distributions, and incredibly efficient at editing text. The downside is a large learning curve.
- Emacs: The other truly powerful text editor. Emacs takes longer to start and is generally a bit more "heavy" than vi (something vi fans are never shy to point out). Its real advantage comes in the huge variety of built-in capabilities, and the ability to trivially extend these capabilities. I do everything from within Emacs, searching for files, searching directories for text, project management, to-do lists, calendars, Git repository management, file renaming, editing files on remote servers, sending emails, internet chats, etc. Even the creation of this very webpage was done within Emacs. Emacs also has a steep learning curve.
- gedit: This is the built-in text editor on Ubuntu. This program is mediocre. I don't recommend it.
- gcc/g++: The primary compiler toolchain used in Linux.
- valgrind: A very powerful tool for analyzing code for memory and resource leaks.
- IDEs: There are quite a few IDEs available for Linux, some of which are
fairly nice. For most of my programming, I use a nice editor and then a
variety of other tools for working with profilers, debuggers, and memory
analyzers, but if you want a single integrated IDE, below are a few
popular choices.
- VS Code: As mentioned in the computer setup option, this open-source Microsoft option seems to be generating a lot of traction.
- NetBeans: Decent choice that is actively developed and widely used, especially for Java.
- Eclipse: In my experience, this is very similar to NetBeans, but likely used slightly more often.
- Qt Creator: I'd say this is the overall best IDE that I've used in Linux.
- PyCharm: This is probably the most widely used Python-specific IDE from previous MSR students.
- Android Studio: This is the standard way to write Android apps, and it works great in Linux.
4.4.3 Office
- LibreOffice: A free clone of Microsoft Office. As much as I dislike using Microsoft products, I will admit that Microsoft Office is much better than LibreOffice. I generally try to stick to LaTeX or Google Docs.
- evince: This is the default PDF viewer in Ubuntu. Another one that I
like is
mupdf. The official Adobe reader is calledacroread– it lost support long ago, but if you are working with a PDF containing Adobe-specific features, it sometimes helps to tryacroread.foxitis easy to install in Linux and has the best support that I've seen for annotating PDFs. - LaTeX: This is a typesetting system where you write computer code that
gets compiled into your final document. It is extremely common for
academic papers and textbooks in technical and scientific fields. I write
almost everything either in
org-mode(an Emacs package) orLaTeX. - zotero: This is an awesome tool for maintaining a library of documents. You can tag and categorize papers that you read/write. Zotero can automatically import documents off of common internet archives (IEEE, arXiv, JSTOR, Elsevier, etc.). Collections of documents can automatically be exported to bibliographies, and all of your work can be backed-up to their cloud for free. Mendeley is another option that many people use.
- unoconv: This is a package that allows you to convert various document formats to other formats e.g. word docs to PDF. Can be very useful when people send you proprietary Microsoft formats that aren't opening nicely in LibreOffice.
- pandoc: This can be a bit challenging to learn, but it is a general-purpose text conversion tool that can convert documents to/from many different formats.
4.4.4 Web
- Chrome/Firefox (Chromium/Iceweasel): Chrome and Firefox work great in most Linux distributions (including Ubuntu). There are also open-source versions of each of these (Chromium and Iceweasel)
- Markdown Preview Plus: This is an awesome Chrome extension that allows me to edit Markdown code on my computer and watch the nicely-rendered HTML code be generated in real-time. Firefox has Markdown Viewer. Note that there are other viewers as well. This just happens to be the one I use.
- User-Agent Switcher: This Chrome extension lets you spoof your browser's User-Agent string. This is often enough to convince websites that you are not on Linux and stop giving you warnings about being on Linux. Some websites will even refuse to load if they think you are on Linux, and this can often get around that.
- onshape: Onshape is a 3D CAD system that operates completely in a browser. SOLIDWORKS is one of the few programs that I really miss about using Linux full-time. This is a free, easy-to-use replacement that provides decent functionality.
4.4.5 General
- wine: This can be used to run many Windows programs within your Linux environment. Sometimes menus and windows can be a bit quirky, but generally performance is pretty good. Generally this won't work as well with extremely complicated programs (MS Office, SOLIDWORKS).
- VirtualBox: This is a great tool for running virtual machines. It works with no issues in Linux.
- Nautilus: This is the default file browser on Ubuntu.
- steam: Steam works well in Linux, and many games are supported.
- Back In Time: A great backup tool for Linux.
- simplescreenrecorder: This is a great tool for recording your screen.
