Git Exercises
Table of Contents
1 Introduction
In this document I will provide a series of tasks designed to force you to
practice common Git operations. If you are stuck, my recommendation is to
start by perusing the built-in help features of Git (e.g. git commit --help
or man git-commit), but if that documentation is confusing feel free to turn
to the internet or ask me. This is a low-consequence environment where you
can't really hurt anything as the repositories that you'll be working with are
artificial, so feel free to experiment. Here's one tip on your experimentation:
If you don't know or understand the consequences of a certain Git operation you are about to do, one very easy way to test is to copy your whole repository to a new location. Try the operation on the copy, and if it does something unexpected, just delete the copy and you're back where you started.
2 Common Local Repository Operations
For this section, your goal is to create your own Git repository and then perform the described operations on that repository to practice day-to-day operation on a repository that is on your machine.
NOTE: For all images from
gitkbelow, I've explicitly rungitkwith the--allflag.
- Initialize your repository Create an empty working directory and initialize that directory as a Git repository.
Create commits on master branch Your goal now is to generate a series of commits in this repository. You should have at least 4 commits and at least 2 files. It doesn't matter what is in the files, but don't type completely random characters to make it easier to understand what you changed later on. Try to use somewhat descriptive commit messages. Here's what my repo looks like after this step:

Create new branch and produce diverging commits First create a new branch, and then create at least two commits on that branch. See my repo after this step below:

Go back to master and create commit Checkout your master branch and create a new commit on
master. We are making a commit on a past branch to ensure that when we mergemasterand our new branch we don't end up with a fast-forward merge. See image below:
Merge new branch into master We now want to generate a new commit on the
masterbranch that brings in the commits from the new branch. Pay attention to how you perform the merging operation to ensure the new commit is on the master branch. Also be sure to clear up any merge conflicts if they occur. See example below: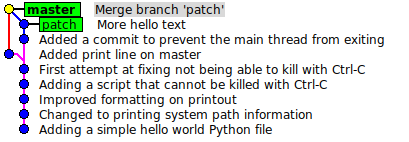
Create a new branch on an old commit Create a branch called
thirdon the second commit (the first child of the root commit), and then check that branch out.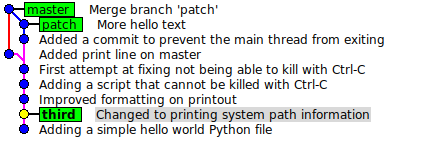
Create commit on
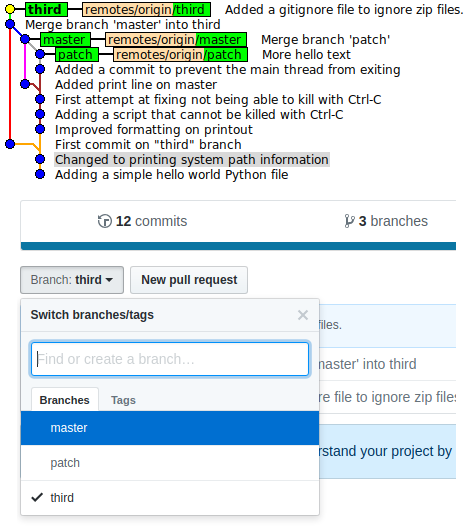
thirdand mergemasterintothirdResolve all conflicts, repo should look like the following: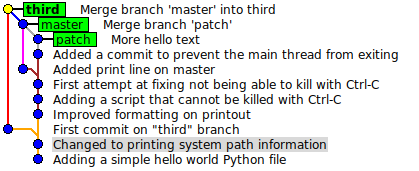
Add a file that should not be tracked Stay on the
thirdbranch. Create azipfile that should not be tracked (you can use thetouchcommand), verify thatgit statusshows the file as untracked. Then create a.gitignorefile that tells Git to ignore this zip file, and verify the file is no longer shown as untracked. Add and commit your.gitignorefile to the repo.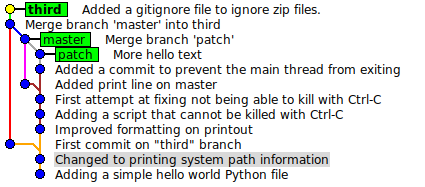
3 Working with Remotes
In this section, we are going to continue developing the repo from the previous section, but we are going to practice working with remotes. Some of these steps require a partner.
Create a GitHub Repo Log into GitHub and click the
New Repositorybutton. Ideally you'd give the GitHub repo the same name as the name that you have used locally. Don't add a README or gitignore.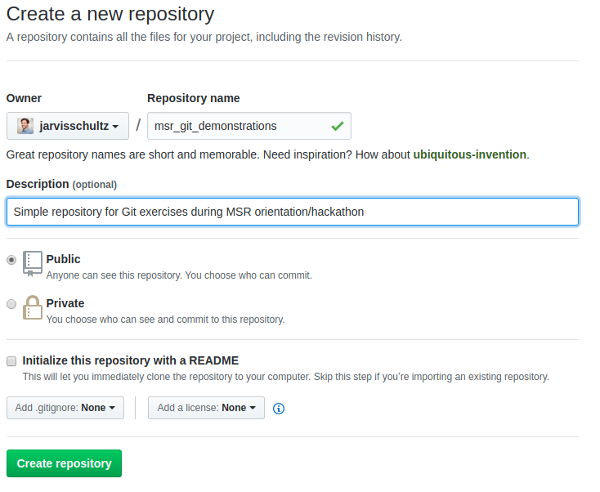
- Add Remote to Local Repo From the command line, add the newly created
GitHub repo as a remote for the previous section. Verify that running
git
     remote -v
shows you the remote name and push/fetch URLs. Push All Branches Push all 3 local branches to GitHub, and verify that you can see the remote references to these branches locally and on GitHub.
Add Partner as Collaborator For this step you will need a partner. Choose one of your GitHub repositories to be the primary repository to work with. The primary owner should add their partner as a
Collaboratorin theSettingssection. This will give the secondary partner the ability to push commits that they create to the primary GitHub repo.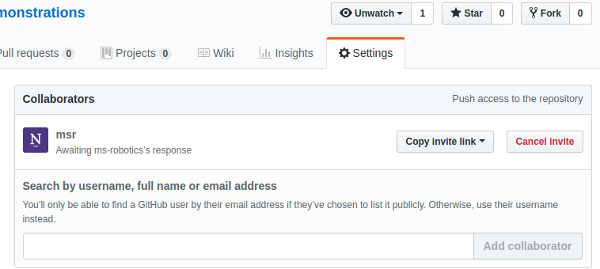
Secondary Partner: Clone, Commit, Push The secondary partner should clone the repo, checkout the
thirdbranch, create a new commit, and then push that commit to GitHub. Be sure you can see this new commit on GitHub, and verify that it was from the secondary partner.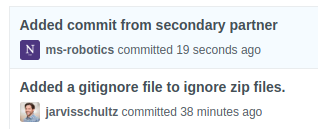
Primary Fetch The primary partner should fetch from the GitHub remote, and verify that they are now able to see the commit created by the partner.
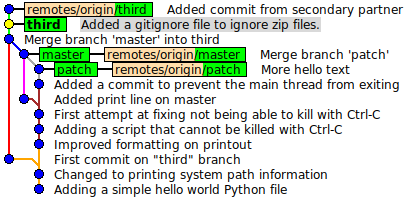
Primary Merge Now the primary partner should merge the commit created by the secondary partner with their local
thirdbranch. This should be a fast-forward merge that completes with no conflicts.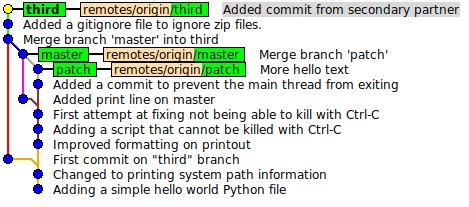
- Double Commit and Push The purpose of this step is to show what happens
when you commit on a shared branch without first fetching. There are going
to be several steps described below:
- Each partner pick a different file in the primary repo, and edit their
chosen file on their local machine while on the
thirdbranch. - Each partner commit the edits that they made.
- The primary partner should push their commit to the GitHub repo, and both partners should verify that they see the newly pushed commit
Now the secondary partner should try pushing their commit and they should be greeted with an error:
Username for 'https://github.com': ms-robots
Password for 'https://ms-robots@github.com':
To https://github.com/jarvisschultz/msr_git_demonstrations.git
 ! [rejected]        third -> third (fetch first)
error: failed to push some refs to 'https://github.com/jarvisschultz/msr_git_demonstrations.git'
hint: Updates were rejected because the remote contains work that you do
hint: not have locally. This is usually caused by another repository pushing
hint: to the same ref. You may want to first integrate the remote changes
hint: (e.g., 'git pull ...') before pushing again.
hint: See the 'Note about fast-forwards' in 'git push --help' for details.
This error is because both partners now have the
thirdbranch pointing at different commits. The primary partner has already pushed their commit, which moved the remote branch. So the secondary partner cannot push their commit without overwriting what the primary user already pushed. So the correct way to solve this error is as described in the above error message. The secondary partner needs to fetch the primary partners changes, merge them with their new commit, and then push the newly merged commit. So let's do that!Secondary partner run a fetch and verify that they can see their partner's new commit.
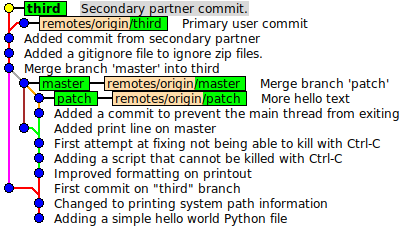
Notice that now we have a diverged history. We now need to merge this change in and then push it to the GitHub remote. Secondary partner should merge the remote's
thirdbranch with their branch and then push to the remote.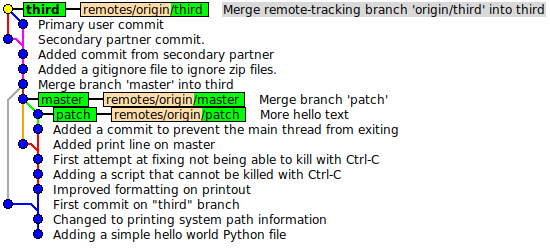
- Finally the primary partner should run a fetch and merge to ensure their
local
thirdbranch is up-to-date with the remote'sorigin/thirdbranch. In other words, when done, the primary partner should have their changes and their partner's changes reflected in their local repo.
- Each partner pick a different file in the primary repo, and edit their
chosen file on their local machine while on the
