Walkthrough: ROS Messages and location_monitor
Table of Contents
1 Submission instructions
This homework will be submitted via Classroom for GitHub. On Canvas, I will post a secret link (don't share this link) that allows you all to create private repositories for turning your homework in with. A GitHub team belonging to the @ME495-EmbeddedSystems organization will automatically be created where you and I are the only people members of that team. I will then automatically be able to see your private repository.
Once you click the secret link and you've logged into GitHub, if this is your
first time using Classroom for GitHub, you will be asked to authorize the
Classroom for GitHub application. Please click the Authorize application
button at the bottom. You will then be taken to a Classroom for GitHub page
that asks if you'd like to accept an invitation to the Walkthrough 1 (F2018)
assignment. Clicking Accept this assignment will automatically create a
repository called walkthrough-1-f2018-YOUR-USERNAME belonging to the
@ME495-EmbeddedSystems organization. Once you've accepted the assignment,
you'll be given a link that is something like
https://github.com/ME495-EmbeddedSystems/walkthrough-1-f2018-YOUR-USERNAME. If
you follow this link GitHub will provide you with instructions to either (a)
quick setup this new repo, (b) create this repo from the command line, (c)
push a repository you already have locally, or (d) import code from another
repo that is already on GitHub.
All deliverables described below should be pushed to this repository, and a URL similar to https://github.com/ME495-EmbeddedSystems/walkthrough-1-f2018-YOUR-USERNAME should be submitted via Canvas before the due date (submitting on Canvas helps me keep straight which students go with which GitHub names).
1.1 Deliverables
The ultimate goal of this assignment is to follow all of the steps below and understand what is going on. As you work through the steps, be sure to understand the code and what each step is doing. I highly recommend using the ROS command line tools to introspect your ROS system after each node you create to make sure the topics and nodes are what you expect them to be. The GitHub link that you submit to me should contain a single ROS package that has all of the code discussed below. Here are a few guidelines that you should try and follow:
- Git Usage
- Your Git repository should only track the relevant files for
your package. Don't track autosave or backup files, and don't
have an entire workspace in the repo. Normally, with ROS, Git
repositories are located in the root directory of a package –
so the
.git/directory would be in the same directory as thepackage.xmland theCMakeLists.txt. Try to commit after every major step to help you get in the habit of using version control correctly. Every repo should have a README file, preferably nicely formatted through a text mark-up language like Markdown (which GitHub automatically parses and formats). - Location Monitor Versions
- In the
location_monitorsections below (Sections 4.3, 4.4, and 4.5), you will be working with 3 separate versions of the same code. Be sure to illustrate to me that you completed all three steps. You could make three different files and link them in your README, you could make separate commits on each version and mention in your README that I should look at the old commits, you could put them on separate branches, etc. It doesn't matter to me, but it would be a good chance to practice Git usage. - ROS Code
- Be sure to follow all of the steps below, and be sure you understand them. I'll be looking that all of the relevant message definitions have been created, and I'll be checking that all of the code for the nodes created is contained within your package. Basically, you are trying to produce a package that proves to me you've followed all steps. Try to follow all ROS naming conventions.
- Questions
- Please don't hesitate to ask questions in class or during office hours. We really want to make sure these fundamental concepts are solidly understood before moving on.
ASIDE: Package, repo, and directory names
In a ROS package, the package resource name for that package is defined by the <name> tag in the package.xml and the project() function in the CMakeLists.txt (they must match or things won't work correctly). The directory that you have these files stored in has nothing to do with the package name. However, for convenience and readability, it is good practice to have the online repo name, the local directory name, and the package name all match. However, due to the limitations of GitHub classroom, for these types of assignments, we won't be able to make all three of those match — the online repo name will always be something like walkthrough-1-f2018-YOUR-USERNAME, and we can't change it. In this assignment you are going to be creating a ROS package named basics (which obviously doesn't match the GitHub repo name), but there is nothing to stop you from naming the directory containing your local copy of the repo match your package name. In other words, you could have a ~/catkin_ws/src/basics/ directory on your computer that contains a package.xml and CMakeLists.txt declaring that directory to be the basics package, but you would push that repo to a Git remote named walkthrough-1-f2018-YOUR-USERNAME. You can even directly clone the GitHub repo into a particular local directory using the optional second argument to git clone e.g. git clone walkthrough-1-f2018-YOUR-USERNAME basics.
2 Introduction and setup
This entire document and any future walkthroughs will assume you've already
setup a catkin workspace and studied the Simple Publisher and Subscriber
tutorial on the ROS wiki, and have a fair idea of what's going on in them.
Further, we'll assume that your workspace is located at
/home/<user>/catkin_ws. If your workspace is in a different location, some
of the commands below will need to be modified.
Before we begin, we need to ensure that we have all of the relevant packages
available for use. We are going to be using the TurtleBot simulation packages
for Gazebo (a robot simulation tool). Unfortunately as of today, most of these
required packages are not yet released on ROS Melodic. If they were released,
we'd be able to install all dependencies with a simple call to apt-get, but
since they are not released we instead need to build the packages from source.
However, to make matters a bit more complicated, the packages from the
official repositories don't build from source properly at the moment (this is
mostly due to API changes in Gazebo that have not been updated in the plugins
for simulating the TurtleBot). However, I have created forks of all relevant
packages that needed changes and fixed the issues myself. So the following
annotated snippet of code should be enough for you to get all relevant
packages built from source (either run line-by-line or convert into a bash
script). If you encounter any errors, please let me know on Canvas.
# We are going to use a combination of "rosinstall" and "rosdep" to get all of
# the source code for unreleased packages and to install any packages that have
# been released that we are going to depend on.

# First, we use "wstool" to allow our pre-existing workspace to work with rosinstall:
cd ~/catkin_ws/src
wstool init

# We download a rosinstall file that contains instructions of a bunch of
# repositories that we want to clone from GitHub:
wget https://raw.githubusercontent.com/NU-MSR/turtlebot/kinetic/turtlebot.rosinstall
# Note that the above URL is pointing to a fork from the NU-MSR organization
# instead of the turtlebot organization. This is where I have fixed issues with
# the main repo.

# Now we "merge" the downloaded rosinstall file with the rosinstall file our
# workspace is already using (which is currently blank)
wstool merge turtlebot.rosinstall

# The contents of the aforementioned rosinstall files are not that complicated,
# I encourage you to look at the downloaded turtlebot.rosinstall file and the
# ~/catkin_ws/src/.rosinstall file that was autogenerated by the above wstool commands

# Now we can actually clone all of the packages contained in rosinstall files:
wstool update

# Now we can use rosdep to install all packages that are currently available on
# "apt-get" that we need to compile all of the cloned packages. Before doing so,
# let's make sure we have an up-to-date list of what packages on our system are
# available on our version of Ubuntu for satisfying ROS dependencies:
rosdep update
# let's also make sure that our list of all packages available on our system is
# up-to-date:
sudo apt-get update
# Actually run apt-get to install any available, missing packages:
rosdep install -y -r --from-paths ~/catkin_ws/src/ --rosdistro=melodic
# The above command will likely generate many warnings about not being able to
# locate rosdep definitions for various dependencies. This is because many of
# the dependencies that we need to install are not yet released (these are the
# packages that we are hopefully about to compile from source). That said, it
# will likely install some packages via apt-get.

# Now we are ready to try and compile from source. Let's cross our fingers and
# hope that everything works:
cd ~/catkin_ws/
catkin_make

# If all packages succeed with no errors, you should be good to go for the rest
# of the assignment. If you encounter an issue, let me know.
Now we're going to create a new package called basics
cd catkin_ws/src
catkin_create_pkg basics rospy roscpp std_msgs geometry_msgs nav_msgs message_generation message_runtime
cd ~/catkin_ws
catkin_make
# don't forget to source your workspace's setup.bash file!
The dependencies listed in the above lines are chosen to setup this package for future walkthroughs.
3 ROS Messages
3.1 Introduction
ROS nodes communicate with each other by publishing messages to topics and
subscribing to those topics. A message is a simple data structure that is
defined in a message file consisting of one field type and one field name
per line. These message files are given a .msg extension. Message files
support both ROS-specific and standard data types (integers, floating points,
Booleans, etc.). ROS has many standard message definitions that are commonly
used, but one can also define custom messages. Any ROS message can be used as a
field type in another message. In this way, messages can include arbitrarily
nested structures and arrays (much like structs in the C programming
language).
Nodes can also communicate via a request-and-response paradigm through ROS
service calls. These request-and-response communications are defined in files
with a .srv extension. The syntax for these files is very similar to that of
message files, but we won't go into details for now. We'll learn more about
this later on.
Message types use a standard naming convention and file hierarchy. Message
types take the form package_name/msg_file_name. For example, the std_msgs
package has a file inside called std_msgs/msg/String.msg (see the file on GitHub), and the message
type is std_msgs/String.
In addition to the message type, messages are versioned by an MD5 sum of the
contents of the .msg file. Nodes can only communicate messages for which both
the message type and MD5 sum match. So, for example, let's say two nodes on
different computers are trying to communicate with each other over a network
using a ROS topic. If the corresponding .msg files on each computer have
different contents, then their MD5 sums won't match. This will generate an MD5
mismatch error when one of the computers publishes a message on that topic.
This is a complications that can arise when attempting to implement systems
with more than one ROS version.
As mentioned above, message files are stored in the msg directory of a package
and they are simple text files with a .msg extension. Below is an example of
a .msg file
# This is a comment
Header header
Bool ready
Float32 range_max
# The '[3]' below indicates an array of length 3:
Float64[3] point
# The '[]' below indicates an array whose length will be specified in the code
# that is using this message. For example, we could use std::vector::push_back
# in C++ or list.append in Python:
Float64[] ranges
Int8 count
geometry_msgs/PoseWithCovariance pose
# You can also define constants:
Int8 default_state=1
So this message file has 8 field types (Header, Bool, Float32,
Float64[3], Float64[], Int8, geometry_msgs/PoseWithCovariance, and
Int8) , and 8 corresponding field names (header, ready, range_max,
point, ranges, count, pose, and default_state). Each line is a
different entry and the format of each line is always <field type> <field
name>.
Given these message definitions, ROS can automatically create code that
implements a native version of the message data structure for a variety of
client libraries when projects are built. So when one runs catkin_make,
message definition files are automatically converted into languages-specific
implementations that can be used in code. In other words, once you define a
message, run catkin_make, and Ta-Da!… it's available for use in all
languages that ROS supports (typically this is just C++ and Python, but there
is also experimental support for Java, C, Lisp, node.js, and maybe others).
More info on the message format and the conversion from ROS primitives into language-specific native data types is available on the msg ROS wiki page.
3.2 Examples
Building off the talker example, we want to create a simple ROS node that publishes random complex numbers instead of just a string with hello world in it. The first thing we do in our package directory is to create a message file with the following contents.
float32 real
float32 imaginary
You can do this from the command line using the following:
cd ~/catkin_ws/src/basics
mkdir msg
cd msg
echo -e "float32 real\nfloat32 imaginary" > Complex.msg
We aren't quite ready to build this custom message yet. We have to tell
catkin that we are going to be building messages in this package, and let it
know about the new message definition so it can generate the language-specific
message code. We do that by making sure that both of the following lines to
are in our package.xml (they should already be there if you followed the
directions up top, but check to make sure)
<build_depend>message_generation</build_depend>
<exec_depend>message_runtime</exec_depend>
Next we go to our CMakeLists.txt and look for the find_package macro. We
verify that message_generation is listed, and that message_runtime is not
(you may have to edit your CMakeLists.txt, the template files created from
catkin_create_pkg are far from perfect):
find_package(catkin REQUIRED COMPONENTS
  geometry_msgs
  nav_msgs
  message_generation
  roscpp
  rospy
  std_msgs
)
We then make sure that our catkin_package command lists a catkin
dependency on the message_runtime package using the CATKIN_DEPENDS
parameter. The standard catkin_package command that was created when we
created our package with catkin_create_pkg needs a little editing:
catkin_package(
#  INCLUDE_DIRS include
#  LIBRARIES basics
CATKIN_DEPENDS geometry_msgs nav_msgs std_msgs message_runtime
#  DEPENDS system_lib
)
Next we tell catkin what message files to compile by adding them to the
add_message_files() call:
# Generate messages in the 'msg' folder
add_message_files(
 FILES
 Complex.msg
)
Finally we make sure the generate_messages() call is uncommented and
contains the list of catkin packages that define their own messages. If we
create a custom message in the basics package that has a field type
defined in a message from one of these other packages, this command ensures
that the messages from the other packages will be built first so that their
language-specific code will be available for use in our custom message.
generate_messages(
  DEPENDENCIES
  geometry_msgs
  nav_msgs
  std_msgs
)
We should now be able to run catkin_make successfully (remember, you must
run this in the root of your workspace). Running rosmsg show basics/Complex
should then yield
float32 real
float32 imaginary
3.2.1 publish_complex_numbers.py
Create a file called publish_complex_numbers.py in the
~/catkin_ws/src/basics/src/ directory with the following content:
#!/usr/bin/env python
import rospy
from basics.msg import Complex
from random import random

def msg_pub():
    rospy.init_node('message_publisher')
    pub = rospy.Publisher('complex',Complex,queue_size=10)
    rate = rospy.Rate(1)
    count = 0
    while not rospy.is_shutdown():

     msg = Complex()
     # Alternatively we can use keyword arguments to initialize the message class. E.g.:
     # 'msg = Complex(real=2.3, imaginary=4.6)' or 'msg = Complex(real=1.2)' or
     # even 'msg = Complex(2.3, 4.6)'
     msg.real = random()
     msg.imaginary = random()
     rospy.loginfo("Complex number %d is %f + %fi", count, msg.real, msg.imaginary)

     pub.publish(msg)
     count +=1
     rate.sleep()

if __name__ == '__main__':
    try:
        msg_pub()
    except rospy.ROSInterruptException:
        pass
After you've created this file, you should be able to run this node with
rosrun. Don't forget that you need to make this node executable using
chmod; something like chmod a+x
~/catkin_ws/src/basics/src/publish_complex_numbers.py should do the trick.
To run using rosrun the syntax would be something like rosrun basics
publish_complex_numbers.py. Once the node is running you should be able to
see the topic /complex showing up in the list of currently available
topics provided by rostopic list. You should also be able to see the
contents being published on this topic using rostopic echo /complex. What
frequency should rostopic hz /complex return? Does it?
Notes
- At the beginning of the script we import the definition of our
basics/Complexmessage from thebasics.msgPython module. This way we can use thebasics/Complexmessage type for publishing/subscribing. Note that in thetalker.pyexample, the equivalent line readfrom std_msgs.msg import String. Does this difference make sense given the naming conventions discussed earlier? These lines are the lines that make the language-specific code generated by catkin available to the rest of the script. In Python, thesetup.bashscripts located in thedevel/directory of a workspace help Python figure out where to find this language-specific code via thePYTHONPATHenvironment variable. When we run
catkin_make, Python scripts parse theComplex.msgfile and generate a new Python class definition that enables a Python script to use thebasics/Complexmessage in ROS code. Hence we instantiate an instance of the class withmsg = Complex(). We can instantiate our class with values of our choosing explicitly like we've done or by using keyword arguments as shown in the comment. If no values are provided, both real and imaginary field default to zero. Commenting out linesmsg.real = random() msg.imaginary = random()
and running the code confirms this.
3.2.2 triple_complex_numbers.py
Building off the example from the previous section, we create a slightly
more complex ROS node that subscribes to a topic, modifies the data, and
then sends the modified data on it's merry way (in ROS terms the new data is
published on a different topic). In this example we simply triple the random
complex numbers generated in the previous script. Don't forget to make the
node executable so that you can rosrun it.
#!/usr/bin/env python
import rospy
from basics.msg import Complex

def data_received_cb(latest_msg):
    '''
    Triple the complex numbers published on the /complex topic and publish
    new values on /tripled topic

    :param latest_msg: contains copy of last published data
    :type latest_msg: basics.msg.Complex class auto-generated by catkin
    :return: None
    '''
    latest_msg.real *= 3
    latest_msg.imaginary *= 3
    pub.publish(latest_msg)
    rospy.loginfo('tripled complex number is %f + %fi', latest_msg.real, latest_msg.imaginary)
    return


if __name__=='__main__':
    rospy.init_node('tripler')
    pub = rospy.Publisher('tripled', Complex, queue_size=1)
    rospy.Subscriber('complex', Complex, data_received_cb)
    try:
        rospy.spin()
    except KeyboardInterrupt:
        print("Shutting down")
Notes
- As in the previous example, we import the
basics.msgso that we can use thebasics/Complexmessage type later on in our script publishing. As an excercise try importingFloat32from thestd_msgspackage and replacing the appearances ofComplexwithFloat32in therospy.Publisherandrospy.Subscriberlines. This should throw an MD5 mismatch error in a terminal that is running thepublish_complex_numbers.pyscript. This is because the publisher on the/complextopic is sending out data of typebasics/Complex, but the subscriber to that topic (in thetriple_complex_numbers.pyscript) is now looking for data of typestd_msgs/Float32. - The
latest_msgargument in the definition of thedata_received_cbfunction is a copy of the latest data that was published on the/complextopic. Thepublish_complex_numbers.pyscript has already filled thelatest_msg.realandlatest_msg.imaginaryfields with the random complex numbers. This is why we can simply*=them by 3 and re-publish on a different topic without ever instantiating a new instance of theComplexclass. The third argument to the
rospy.Subsriberinitialization function is an optional named argument called callback and it has a default value ofNone. Every time a message of the correct type is published on the topic that therospy.Subscriberis subscribed to, the function specified by this third argument is automatically called with this message as the argument. Another way of thinking about a callback function is that this is the function where data checking and manipulation is carried out. If the topic we're subscribing to isn't being published, we can't do anything, and the function is never called. Likewise if messages are being publishing on this topic, the callback function is where we manipulate the data we receive to achieve the goal of the node. Think of it this way: There are three people in a kitchen making a burger.- A is the fry-cook that grills the beef patty and sends it to B
- B is the assembler who adds the bread, lettuce, onions, bacon, cheese, and tomatoes, and then plates the burger
- C is the server who takes the burger to the customer D
In ROS terms:
- B "subscribes" to A and has to wait for A to "publish" the burger
- In B's "callback", he transforms a beef patty into a burger and then "publishes" it to the completed burger topic as soon as its ready
- C "subscribes" to the completed burger topic "published" by B and "publishes" the completed burger to the delivered burger topic by delivering it across the room while executing his own "callback"
- D "subscribes" to the delivered burger topic, and consumes the burger in his callback
ASIDE: Why do we need nodes?
While you can, in principle, do everything in one script or node, breaking up tasks into separate software components each responsible for one thing helps us keep our code "modular". Modular code is easier to maintain, faster to develop, and easier to reconfigure/repurpose. The definition of "one thing" varies, as multiple operations may always belong together and could thus constitute "one thing". Having one node doing one task allows for easier development and debugging as you can ensure its "one thing" is working perfectly before you move on and start developing the next node.
4 Location Monitor
In this section we create a node called location_monitor that uses
publishers, subscribers, and messages to report on what landmarks a simulated
robot is close to. We'll be using a simulation of a TurtleBot in Gazebo.
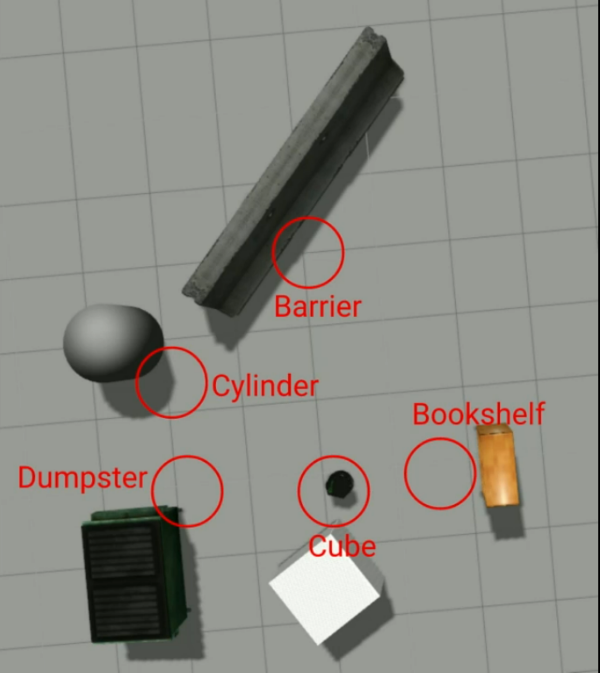
Figure 1: Overhead view of the simulated world, and the locations and names of the landmark zones
4.1 Objectives
Our node will listen to a topic that tells us where the simulated robot is in the world. Then the nodes we write will:
- Publish the name and distance to the closest landmark
- Print out a notification when the robot enters a landmark zone
4.2 Getting started
We're going to need at least 3 terminals:
- In the first terminal run
roslaunch turtlebot_gazebo
      turtlebot_world.launch
. This launches a Gazebo simulation with a TurtleBot and a set of obstacles. - In the second terminal run
roslaunch turtlebot_teleop
      keyboard_teleop.launch
. This allows us to drive the TurtleBot in the world using the keyboard. - In the third terminal run
rostopic listto see all of the topics being published. We're interested in the/odomtopic to figure out where the robot is in the world. runrostopic info /odomto find out more about the topic. You see that it is of typenav_msgs/Odometrywherenav_msgsis the package and a file calledOdometry.msgwould define the message type. This indicates that we'll wantnav_msgsas a dependency when we're creating our ROS package. - Again in the third terminal run
rostopic echo /odomto print out all messages being published on the/odomtopic. Now try driving the turtlebot in the second terminal using your keyboard and watch how the pose and orientation change as you drive the simulated TurtleBot.
4.3 Location Monitor: Version 1
Change directory to your basics package and create a file called
location_monitor_node.py and make it executable with. E.g.
cd ~/catkin_ws/src/basics/src
touch location_monitor_node.py
chmod a+x location_monitor_node.py
Now fill in the following code:
#!/usr/bin/env python
import rospy
from nav_msgs.msg import Odometry

def odom_cb(msg):
    x = msg.pose.pose.position.x
    y = msg.pose.pose.position.y
    rospy.loginfo("x: {}, y: {}".format(x,y))

def main():
    rospy.init_node('location_monitor')
    rospy.Subscriber("odom", Odometry, odom_cb)
    rospy.spin()

if __name__ == '__main__':
    main()
This is version 1 of our location_monitor node. It subscribes to the
/odom topic and prints out the \(x\) and \(y\) coordinates of the robot
like this
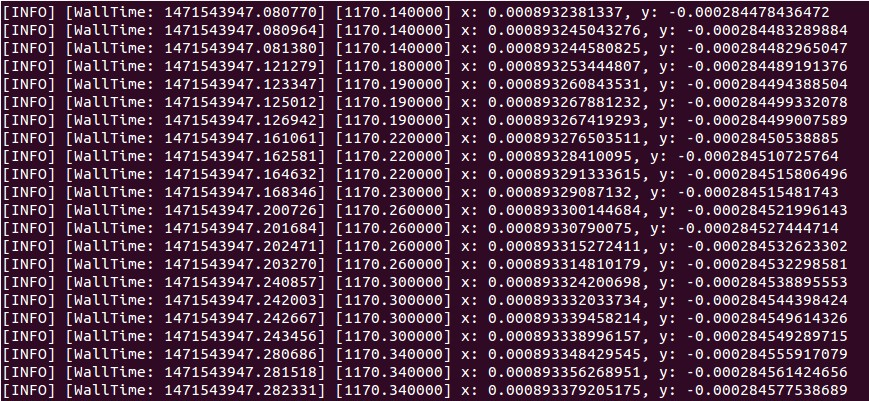
Moving the turtlebot using the teleop terminal while location_monitor node
is running will result in the \(x\) and \(y\) coordinates changing. Note
that the /odom topic is being published at nearly 100 Hz (as can be seen
with rostopic hz /odom). Printing anything out this fast is not generally
good practice – it slows your code down, and is difficult to read.
4.3.1 Messages in Version 1
We're using the nav_msgs package which defines many message, service and
action types. We can easily see the complete message definition of the
message we're using with rosmsg show nav_msgs/Odometry
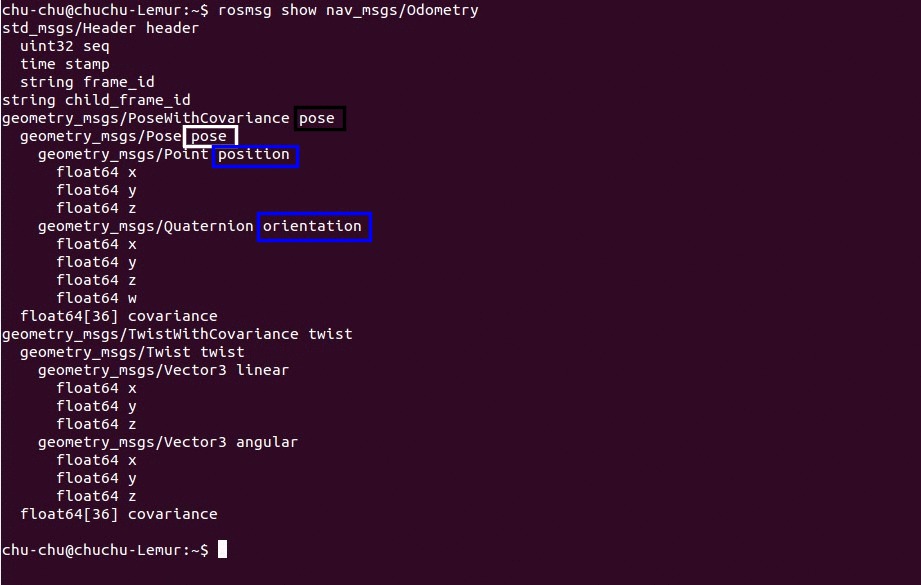
To access the \(x\), \(y\) and \(z\) coordinates, we start from the top level pose in black, move to the second level pose in white, then to the third level position and orientation in blue which gives \(x\),\(y\),\(z\) and \(x\),\(y\),\(z\),\(w\) field names respectively – all of type float64.
We're interested in the \(x\) and \(y\) positions of the robot. To do that we step down three layers {1st layer}.{2nd layer}.{3rd layer}.{coordinate}
x = msg.pose.pose.position.x
y = msg.pose.pose.position.y
This layering hierarchy is a result of how rospy was designed to mimic
the nested structure of message descriptions in .msg files. All ROS
messages in Python will mimic this same structure. Also note that in C++
the structure is very similar, but with different syntax (obviously).
4.4 Location Monitor: Version 2
Edit your code from the last section to look like the following.
#!/usr/bin/env python
import rospy
from nav_msgs.msg import Odometry
import math

landmarks = []
landmarks.append(("Cube",0.31,-0.99));
landmarks.append(("Dumpster", 0.11,-2.42));
landmarks.append(("Cylinder", -1.14,-2.88));
landmarks.append(("Barrier", -2.59,-0.83));
landmarks.append(("Bookshelf", -0.09, 0.53));

def distance(x1, y1, x2, y2):
    xd = x1 - x2
    yd = y1 - y2
    return math.sqrt(xd*xd + yd*yd)

def callback(msg):
    x = msg.pose.pose.position.x
    y = msg.pose.pose.position.y
    rospy.logdebug("x: {}, y: {}".format(x,y))
    closest_name = None
    closest_distance = None
    for l_name, l_x, l_y in landmarks:
        dist = distance(x, y, l_x, l_y)
        if closest_distance is None or dist < closest_distance:
            closest_name = l_name
            closest_distance = dist
    rospy.loginfo("Landmark: {} || Distance: {}".format(closest_name,closest_distance))

def main():
    rospy.init_node('location_monitor')
    rospy.Subscriber("odom", Odometry, callback)
    rospy.spin()

if __name__ == '__main__':
    main()
In version 2 of our code:
- We hard-code the coordinates of the various landmarks (unfortunately, as a global variable) and append them to a list
- We implement a distance function simply computes the Euclidean distance between two points
- In our callback function we check the distance between where we are and each of the landmarks
- We then print out the closest landmark to the robot and the distance to it
4.5 Location Monitor: Version 3
Below is version 3 of the location_monitor node:
#!/usr/bin/env python
import rospy
import math
from nav_msgs.msg import Odometry
from basics.msg import LandmarkDistance #1

def distance(x1, y1, x2, y2):
    xd = x1 - x2
    yd = y1 - y2
    return math.sqrt(xd*xd + yd*yd)

class LandmarkMonitor(object): #2
    def __init__(self, landmark_pub, landmarks):
        self._landmark_pub = landmark_pub
        self._landmarks = landmarks

    def callback(self, msg):
        x = msg.pose.pose.position.x
        y = msg.pose.pose.position.y
        closest_name = None
        closest_distance = None
        for l_name,l_x, l_y in self._landmarks:
            dist = distance(x, y, l_x, l_y)
            if closest_distance is None or dist < closest_distance:
                closest_name = l_name
                closest_distance = dist
        ld = LandmarkDistance() #3
        ld.name = closest_name
        ld.distance = closest_distance
        self._landmark_pub.publish(ld) #4
        if closest_distance < 0.5: #5
            rospy.loginfo("I'm near the {}".format(closest_name))


def main():
    rospy.init_node('location_monitor_node')
    landmarks = []
    landmarks.append(("Cube", 0.31, -0.99));
    landmarks.append(("Dumpster", 0.11, -2.42));
    landmarks.append(("Cylinder", -1.14, -2.88));
    landmarks.append(("Barrier", -2.59, -0.83));
    landmarks.append(("Bookshelf", -0.09, 0.53));

    landmark_pub = rospy.Publisher("closest_landmark", LandmarkDistance, queue_size=10)  #6
    monitor = LandmarkMonitor(landmark_pub, landmarks) #7
    rospy.Subscriber("odom", Odometry, monitor.callback) #8

    try:
        rospy.spin()
    except KeyboardInterrupt:
        print("Shutting down")


if __name__ == '__main__':
    main()
Below are some annotations that go along with the code above that describe notable changes that have been implemented in version 3:
We write a custom message called
basics/LandmarkDistancethat contains the name of the landmark and the distance to it in meters. Creating this message and getting it compiled properly is an exercise left to the reader. The contents ofLandmarkDistance.msgare as follows:string name # Name of the landmark float64 distance # distance to the landmark in meters
- We avoid global variables through the use of Python classes.
- We instantiate an instance of the
LandmarkDistancemessage class that we will fill out and publish each time we receive a new message on theodomtopic. - Publish the contents of our message each time
LandmarkMonitor.callbackis run. - We print out a message if the robot is within 0.5 meters of the landmark.
- Since we're publishing a message to a topic, we can view the messages
published on that topic with
rostopic echo /closest_landmarkwhen the node is running in another terminal.
- Since we're publishing a message to a topic, we can view the messages
published on that topic with
- We create a topic called
closest_landmarkand publish the data which is of message typebasics/LandmarkDistance - We instantiate an instance of the
LandmarkMonitorclass. - We subscribe to the
odomtopic and pass thecallbackmethod of themonitorinstance of theLandmarkMonitorclass as the callback argument to therospy.Subscriberinitialization function (whew… that's a mouthful).
4.6 Final notes and observations
- It is good practice to ensure your Python nodes and packages have different names to help avoid naming conflicts.
- It is recommended to have the package name (as defined in the
package.xmlandCMakeLists.txt) to be in a directory of the same name. So in this example, we have a directory~/catkin_ws/src/basicsthat contains apackage.xmlandCMakeLists.txtthat define the package name to also bebasics. While this isn't strictly required, it does make it easier to recognize packages in a workspace. - It is common practice in ROS to create a bunch of messages related to a
given topic inside their own package (e.g.,
std_msgs,geometry_msgs,nav_msgs,sensor_msgs). In other words this package would contain only message, service, and action definitions and no nodes. This results in simpler dependency hierarchies. - Here are a few things to think about:
- In Version 2 could we publish
closest_nameandclosest_distancewithout using a custom message? - If we could, how would you do it?
- What would be some pros and cons of using custom messages vs fitting your data into already-defined messages?
- In Version 2 could we publish
- Classes are a good way to help us avoid global variables. This is true in Python and C++. Classes have many other benefits, but in ROS, this is one benefit that comes up often.
- It's good practice to develop your code incrementally. Get one part working then move on to the next part. This can significantly accelerate the debugging process.
5 References
Inspiration for much of the content from the location_monitor was taken
from Justin Huang's excellent YouTube series.
