Homework: Navigation and particle filter estimation
Table of Contents
1 Problem 1
In this problem you will use the turtlebot_gazebo simulator to work with the navstack. Complete the following steps. In your final write-up, be sure to include anything specifically mentioned in the steps.
1.1 Build a Custom Gazebo World
You will begin by creating a custom Gazebo world that your simulated turtlebot will navigate in. Follow the Building a world tutorial on the Gazebo site to build a custom world and save it as an SDF file. Ideally, this world will mimic an indoor environment that you might actually have the turtlebot navigating in. For example, it could have walls, tables, chairs, etc. If you don't include enough obstacles your robot will have trouble localizing. You can look at the example world from the next section to give you a sense of scale. In your write-up, be sure to include the SDF file for the final version of your world, and a screenshot from Gazebo of the turtlebot in the world.
1.2 Create a Map of the World
In this section, you will launch Gazebo with your custom world. Then you will use the gmapping package to build a map of this world. Follow the first, second, and third tutorials of the turtlebot_gazebo tutorials to figure out how to do this. Try to build the best map possible. You want to avoid holes, include all visible portions of obstacles, and have the obstacles nicely represent the actual shape of the objects. Try to drive slowly, and don't be afraid to re-scan portions that have already been seen. You may also find the SLAM Map Building with TurtleBot tutorial helpful. In your write-up, include the YAML and pgm file created for the map of your world.
1.3 Navigate in Your Map
In this section you will use amcl for localization within your map, and you
will use the rest of the navstack to navigate within the map. To do this, you
will follow the last two sections of the third turtlebot_gazebo tutorial. You
may also wish to check out the Autonomous Navigation of a Known Map with TurtleBot
tutorial. Once you are able to send navigation goals in rviz, send several
goals to the turtlebot and observe its behavior. Can you make the global
and/or local planner fail? Do you ever observe any recovery behaviors?
Include a screenshot of rviz during the execution of a plan. I should be able to see the turtlebot, the global/local plan, the static map, the costmap, and the costs used in computing the global plan.
See figure below for an example screenshot.
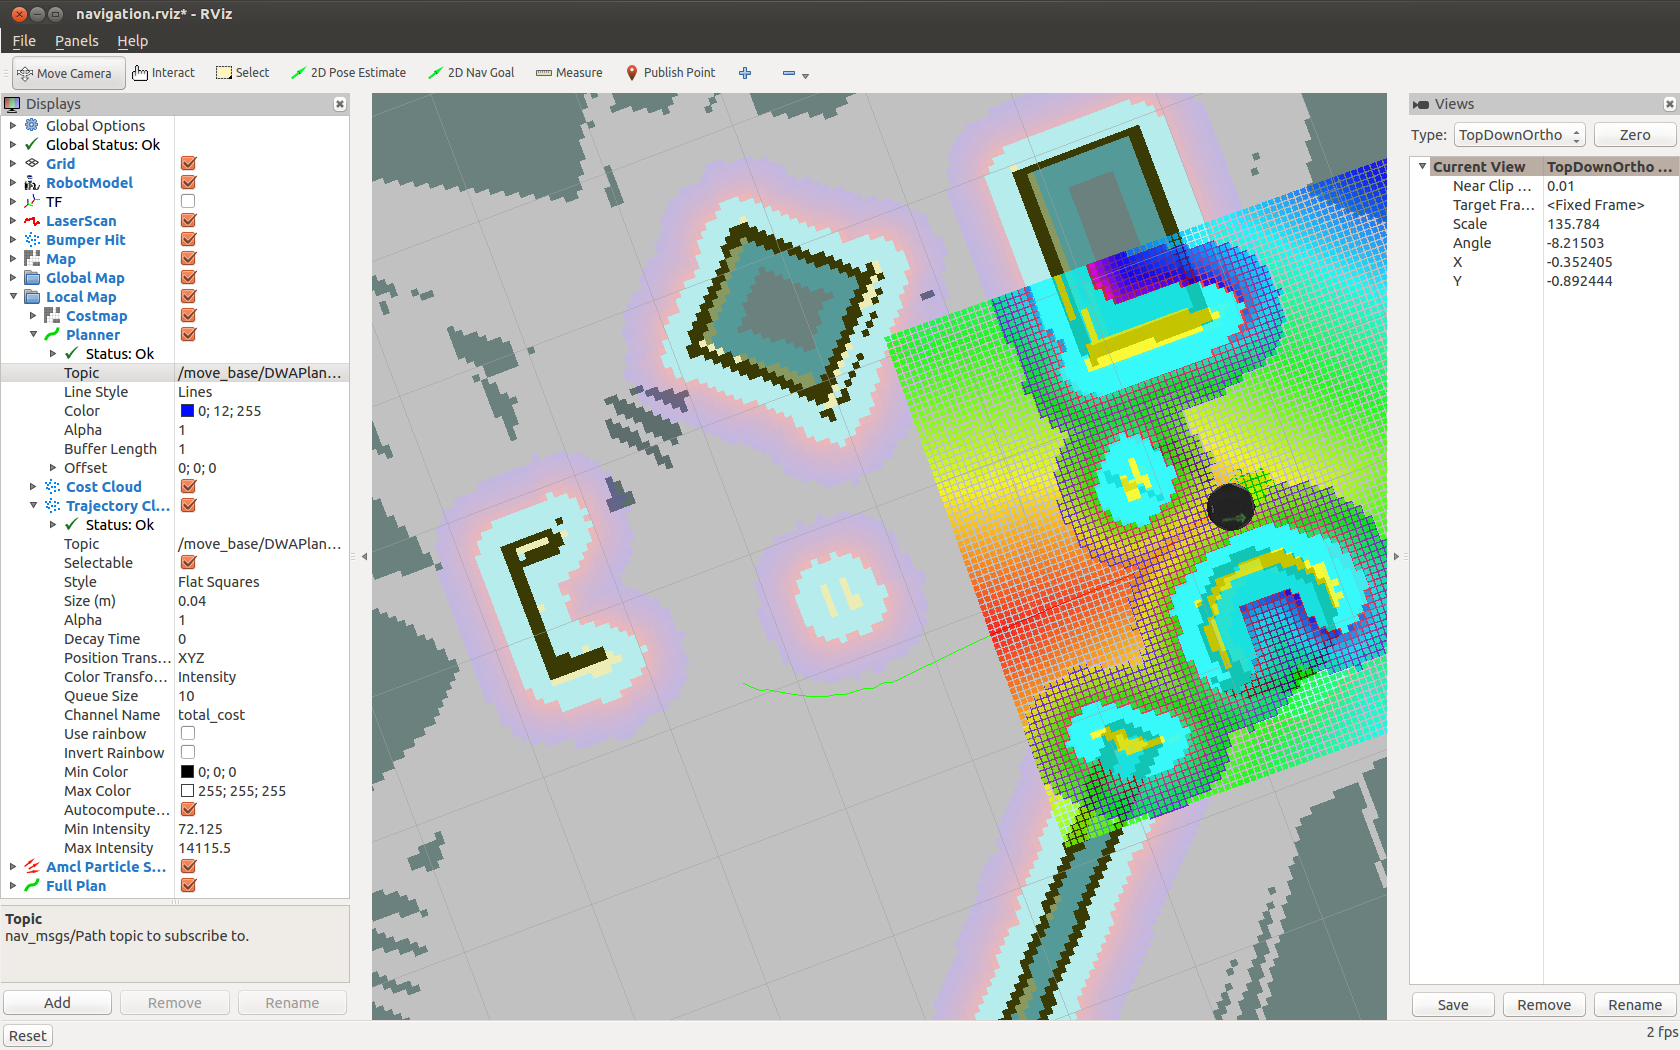
Figure 1: Example rviz screenshot of the turtlebot navigating a Gazebo world.
1.4 Insert Unknown Obstacles
In this section, you will be running the Gazebo+amcl+navstack setup from the previous section. After sending a few navigation goals, add several obstacles into your Gazebo world. These obstacles are not part of the static map layer (because you didn't map them with gmapping). However, they should show up in your dynamic costmap layer. So, your turtlebot should be able to navigate around these obstacles. Once the obstacles are added, send navigation goals that force the robot to navigate around these obstacles. Note that if the Kinect on the turtlebot can see the obstacles when they are added they will immediately show up in the costmap, and the global planner will produce plans that navigate around the obstacles. Instead, if added obstacles are not visible during the global planning phase, you should see the local planner navigate around them when the obstacles come into view. Try to setup a scenario where the global and local planner differ significantly. Include a screenshot of the turtlebot navigating around added obstacles in your write-up.
2 Problem 2
Your goal in this problem is to write a particle filter for a simple kinematic
car robot driving in the plane. The robot has a 1-D sensor that measures the
\(y\)-direction distance to the \(x\) axis. The robot's kinematics will be
simulated using the turtlesim package, and the measurements will be accessed
via a service call. Here are the following steps that you need to accomplish
in order to solve this problem.
- Clone the starter code from here into a workspace. This package contains a
launch file called
run_turtle_measurements.launchto get you started. The launch file will start theturtlesim_node, a keyboard teleoperation node, a measurement node that provides a service server for the simulated measurements and broadcaststfdata from theworldframe to theturtle_frame. The measurements that are provided are based off the ground truth value with additive zero-mean Gaussian noise. The variance of this noise is set via the~meas_noiseprivate parameter. Be sure tocatkin_makeyour workspace. This package has a custom service. - Create a new package that will contain your particle filter implementation.
Feel free to copy the provided launch file and
rvizconfiguration into your package. This package will host your write-up for the entire assignment.
- Your primary task is to then write a node that implements a particle filter
and publishes the particles as a
geometry_msgs/PoseArraymessage. You are free to setup the structure of this node however you see fit. Here are some components that you will definitely need:- You will need to subscribe to the
turtle1/cmd_veltopic. In my callback for this topic I use a slightly modified version of thesample_motion_model_onestepfunction from the notes to update the pose of each particle based on noisy inputs (the nominal input comes from theturtle1/cmd_veltopic). You need to take care that the case of zero translational or angular velocities does not cause problems with your code. - At some point, you will need to call the
/measurementservice to obtain a noisy measurement. In my code, I've created a separate subscriber/callback that allows me to control when measurements are occurring (each time I push a particular button, a measurement is generated). - Once you have the noisy measurement, you will need to calculate weights for each particle. In order to calculate the weight for a given particle, you will need to know the variance of the simulated sensor and the \(y\) component of the particle's pose. The variance should be obtained from the parameter server. Feel free to add a private parameter, set via a launch file, for your node.
- Based on the weights, you will need to resample and update your
geometry_msgs/PoseArray. - Try not to drive your turtle into the edges of its world. When this
happens your turtle will clip its actual position, but your
sample_motion_model_onestepfunction may not clip. This will cause your particles to drift far from the true state and your particle filter will quickly suffer from particle deprivation and uniqueness issues.
- You will need to subscribe to the
- Spend some time playing with the \(\alpha_i\) parameters in the motion model. How do they affect the motion of the particles? How does the variance of your sensor affect the resampling procedure? Can you see what happens when your particle filter suffers from deprivation? Does this happen less when you use more particles?
- Create a single launch file that allows me to run your package. It should
open
rvizwith a nice configuration, and through your README, I should know what parameters I need to pass at the command line. If your measurements do not happen automatically, I need to know how to trigger them.
3 Deliverables
The entire assignment will be submitted via Canvas by providing a single URL to a GitHub repository. If the assignment is not submitted by the due date listed at the top of this page, I will not grade it. Ideally your write-up for both problems will be contained in a single README, and this README will exist in a ROS package that has all nodes required for your particle filter implementation.
